
1Getting started
Snappy Mail works with any email account that offers IMAP for receiving mail and SMTP for sending it, which is almost all of them. Your mail stays on your provider's server, so everything stays in step with your other devices.
Install Snappy Mail
Download the installer for your computer from snappymail.app, then:
| Computer | How to install |
|---|---|
| Mac | Open the .dmg and drag Snappy Mail into Applications. The first time you open it, macOS may say it can't check the app: click Done, then go to System Settings › Privacy & Security and click Open Anyway. |
| Windows | Run the setup.exe. If Windows shows “Windows protected your PC”, click More info, then Run anyway. |
| Ubuntu, Debian, Mint | Double-click the .deb file and choose Install. Snappy Mail appears in your applications menu under Internet. |
| Other Linux | Extract the .tar.gz and run ./install.sh in the extracted folder. It installs just for you, so it usually doesn't need an administrator password. |
Those first-launch warnings appear because these early versions aren't code-signed yet. They only appear the first time.
Add your email account
When you first open Snappy Mail it asks you to add an account. You can add more at any time with the + button at the bottom of the left-hand bar.
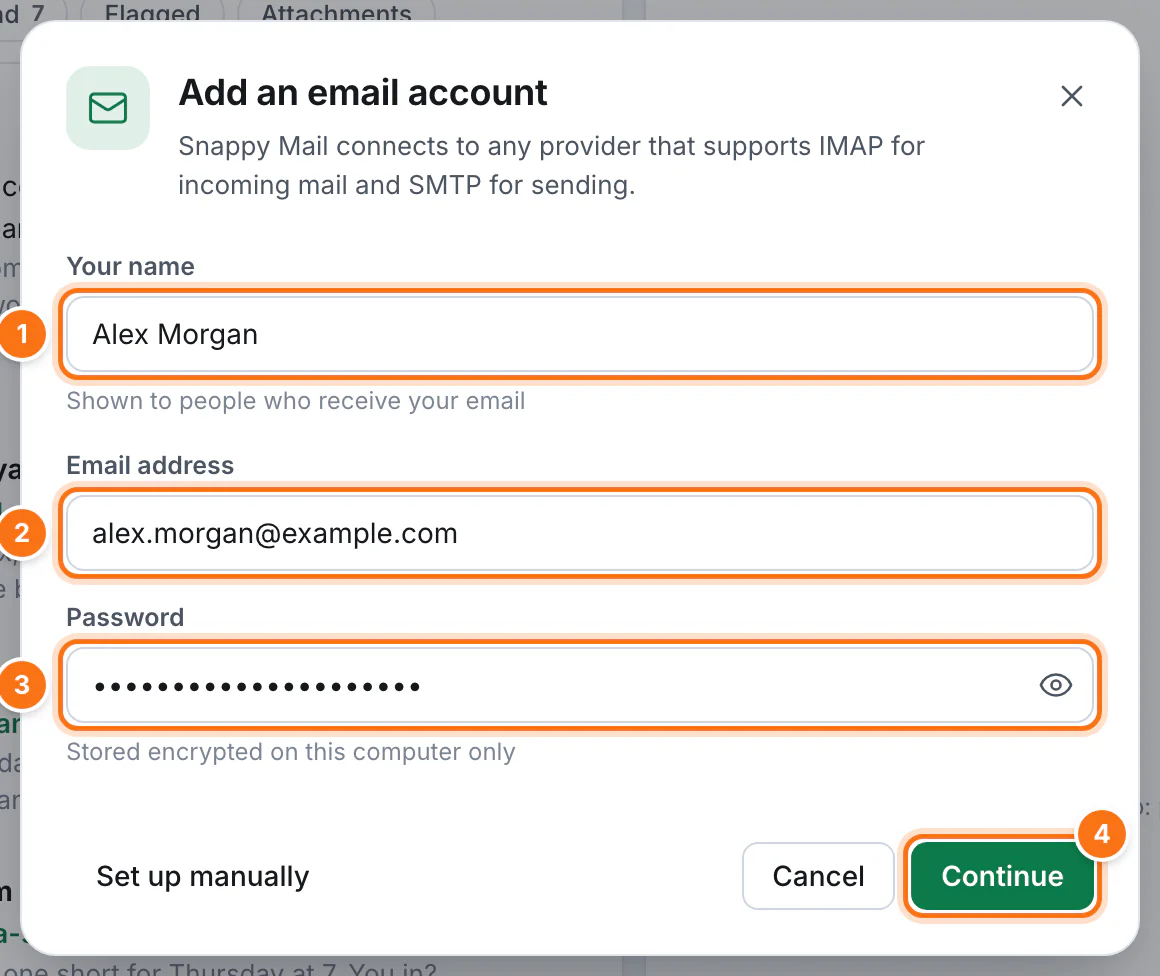
- Enter your name. This is what people see when you email them.
- Enter your email address.
- Enter your password. It's stored encrypted on your computer only. Some providers need an app password instead; see below.
- Click Continue. Snappy Mail looks up your provider's server settings automatically.
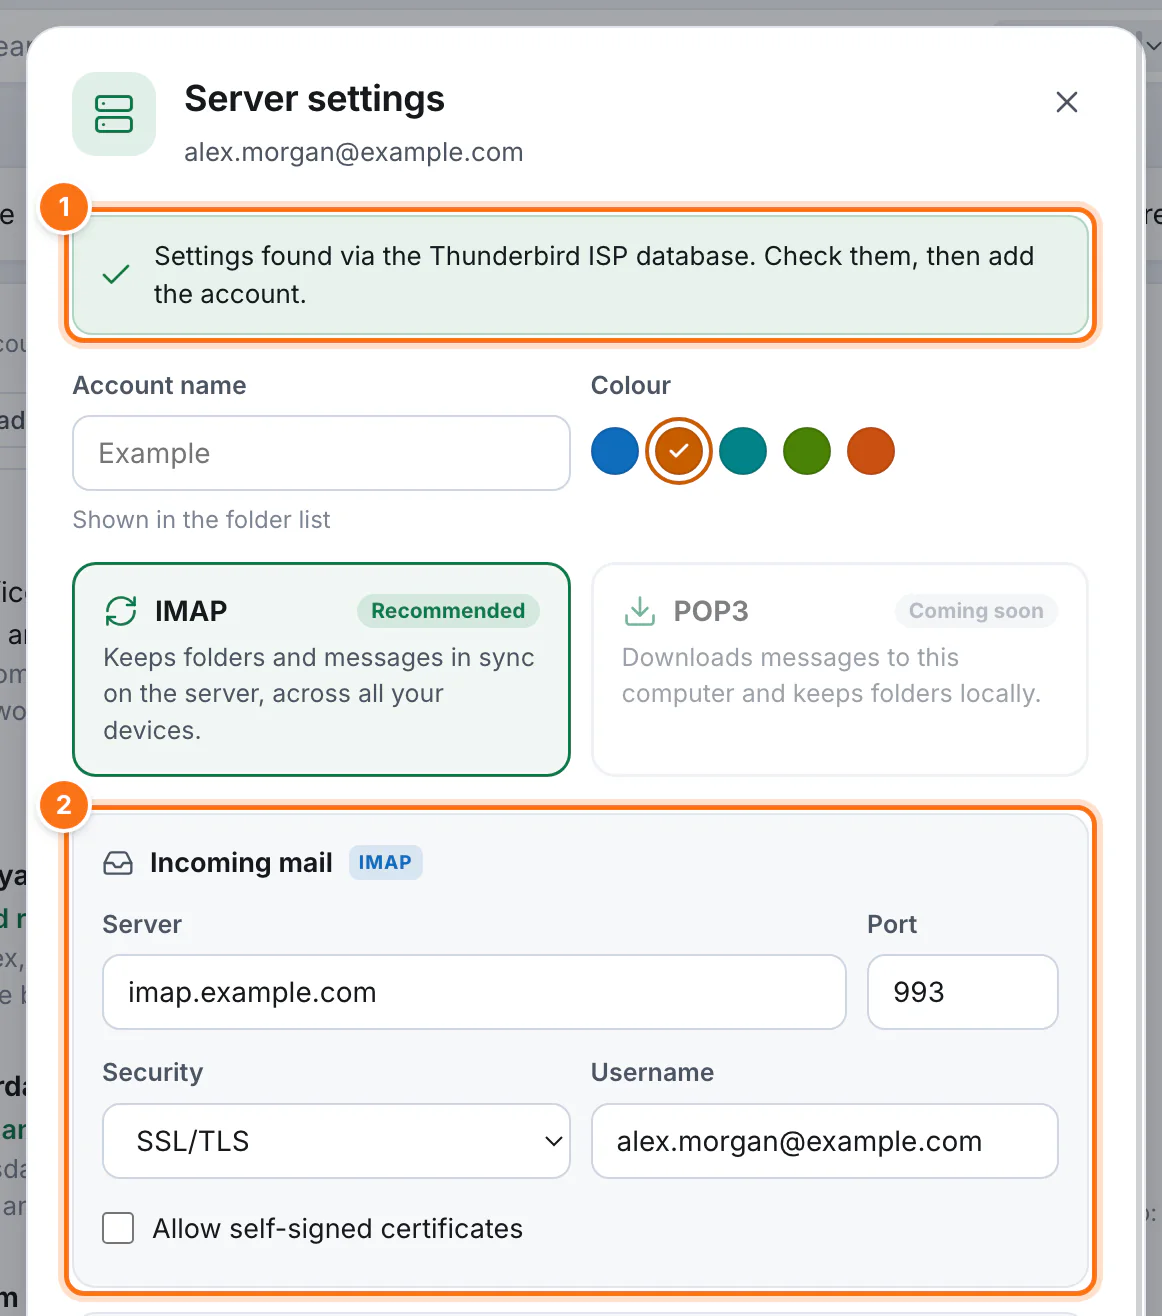
On the next screen 1 tells you the settings were found, and 2 shows them. Give the account a name (such as “Work”) and a colour so you can tell your accounts apart, then click Add account. Snappy Mail signs in to check everything works before it saves the account.
If the settings can't be found, or you know them already, click Set up manually on the first screen and type in the incoming (IMAP) and outgoing (SMTP) server names, ports and security from your provider.
Gmail, iCloud, Yahoo and others
Big providers don't let mail apps use your normal password. Create an app password in your account's security settings and use that instead:
| Provider | What you need |
|---|---|
| Gmail | Turn on IMAP, then create an app password: Google Account › Security › 2-Step Verification › App passwords. |
| iCloud Mail | An app-specific password from account.apple.com. |
| Yahoo and AOL | An app password from your account security settings. |
| Fastmail | An app password (Settings › Privacy & Security). |
| Outlook.com and Microsoft 365 | Not yet: Microsoft only allows browser sign-in, which is coming to Snappy Mail soon. |
| Your own or your company's server | Usually works as it is. If the server uses a self-signed certificate, tick Allow self-signed certificates. |
2Find your way around
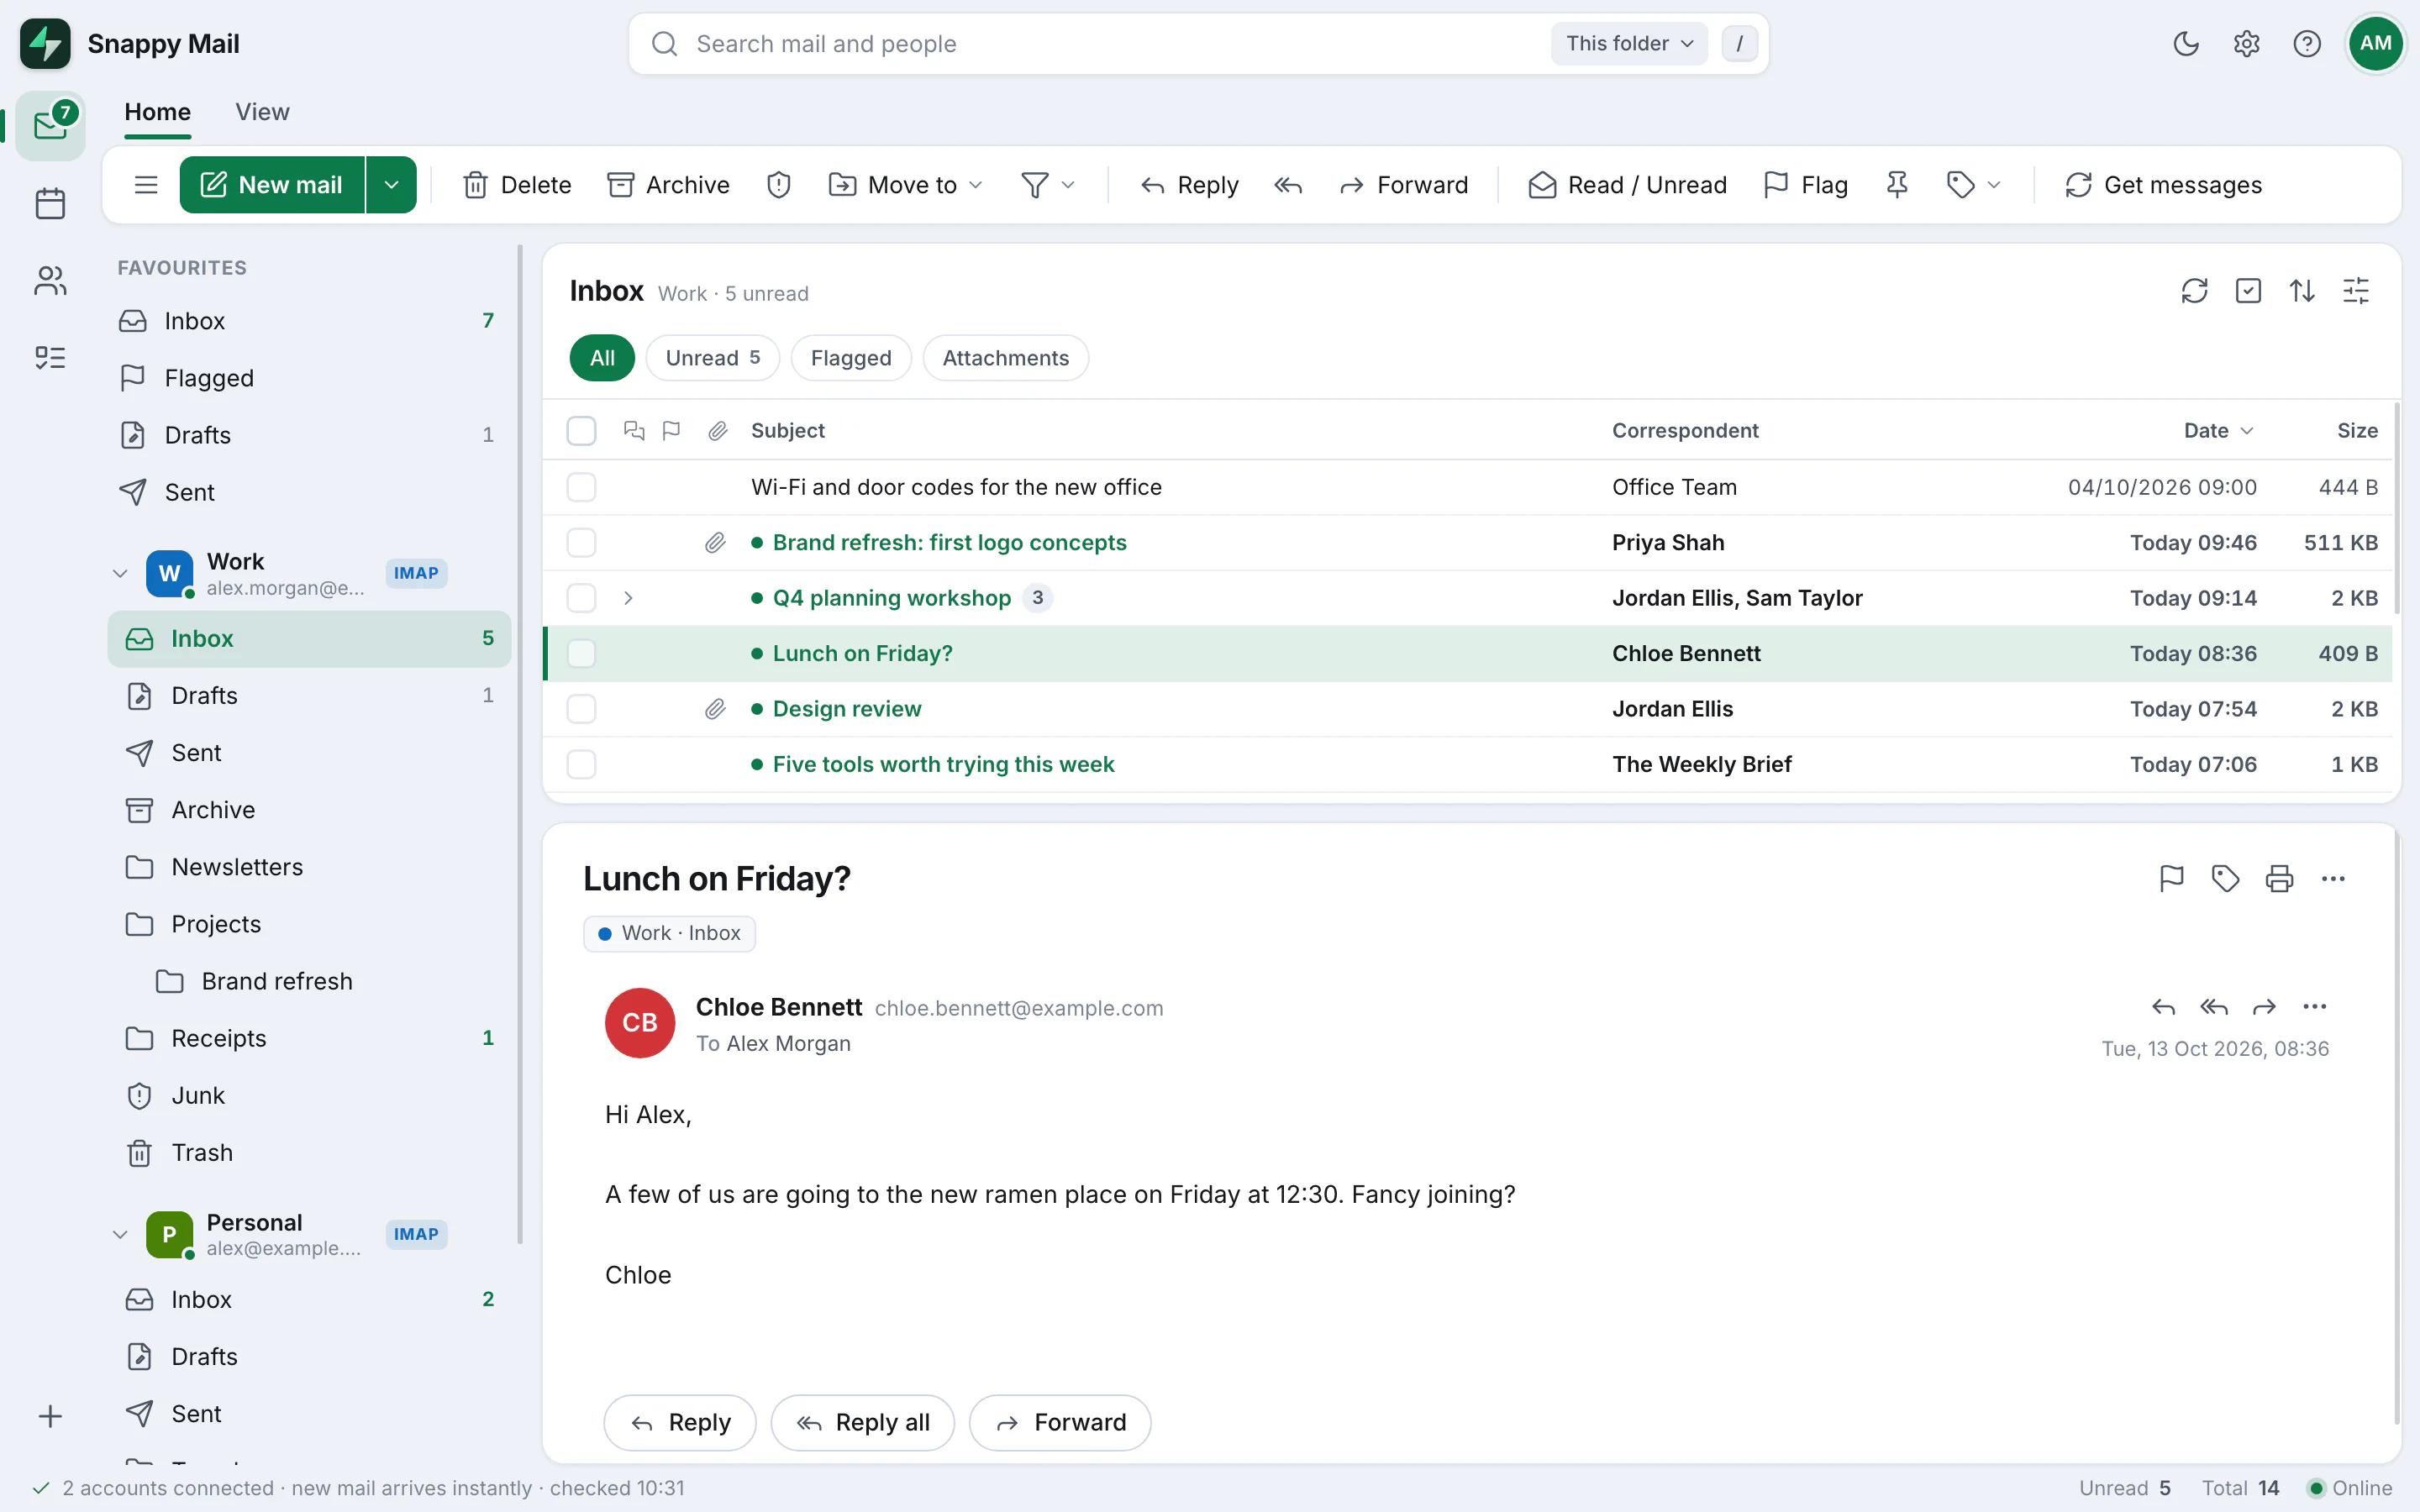
Snappy Mail is laid out like Outlook: folders on the left, your messages in the middle and the open message on the right.
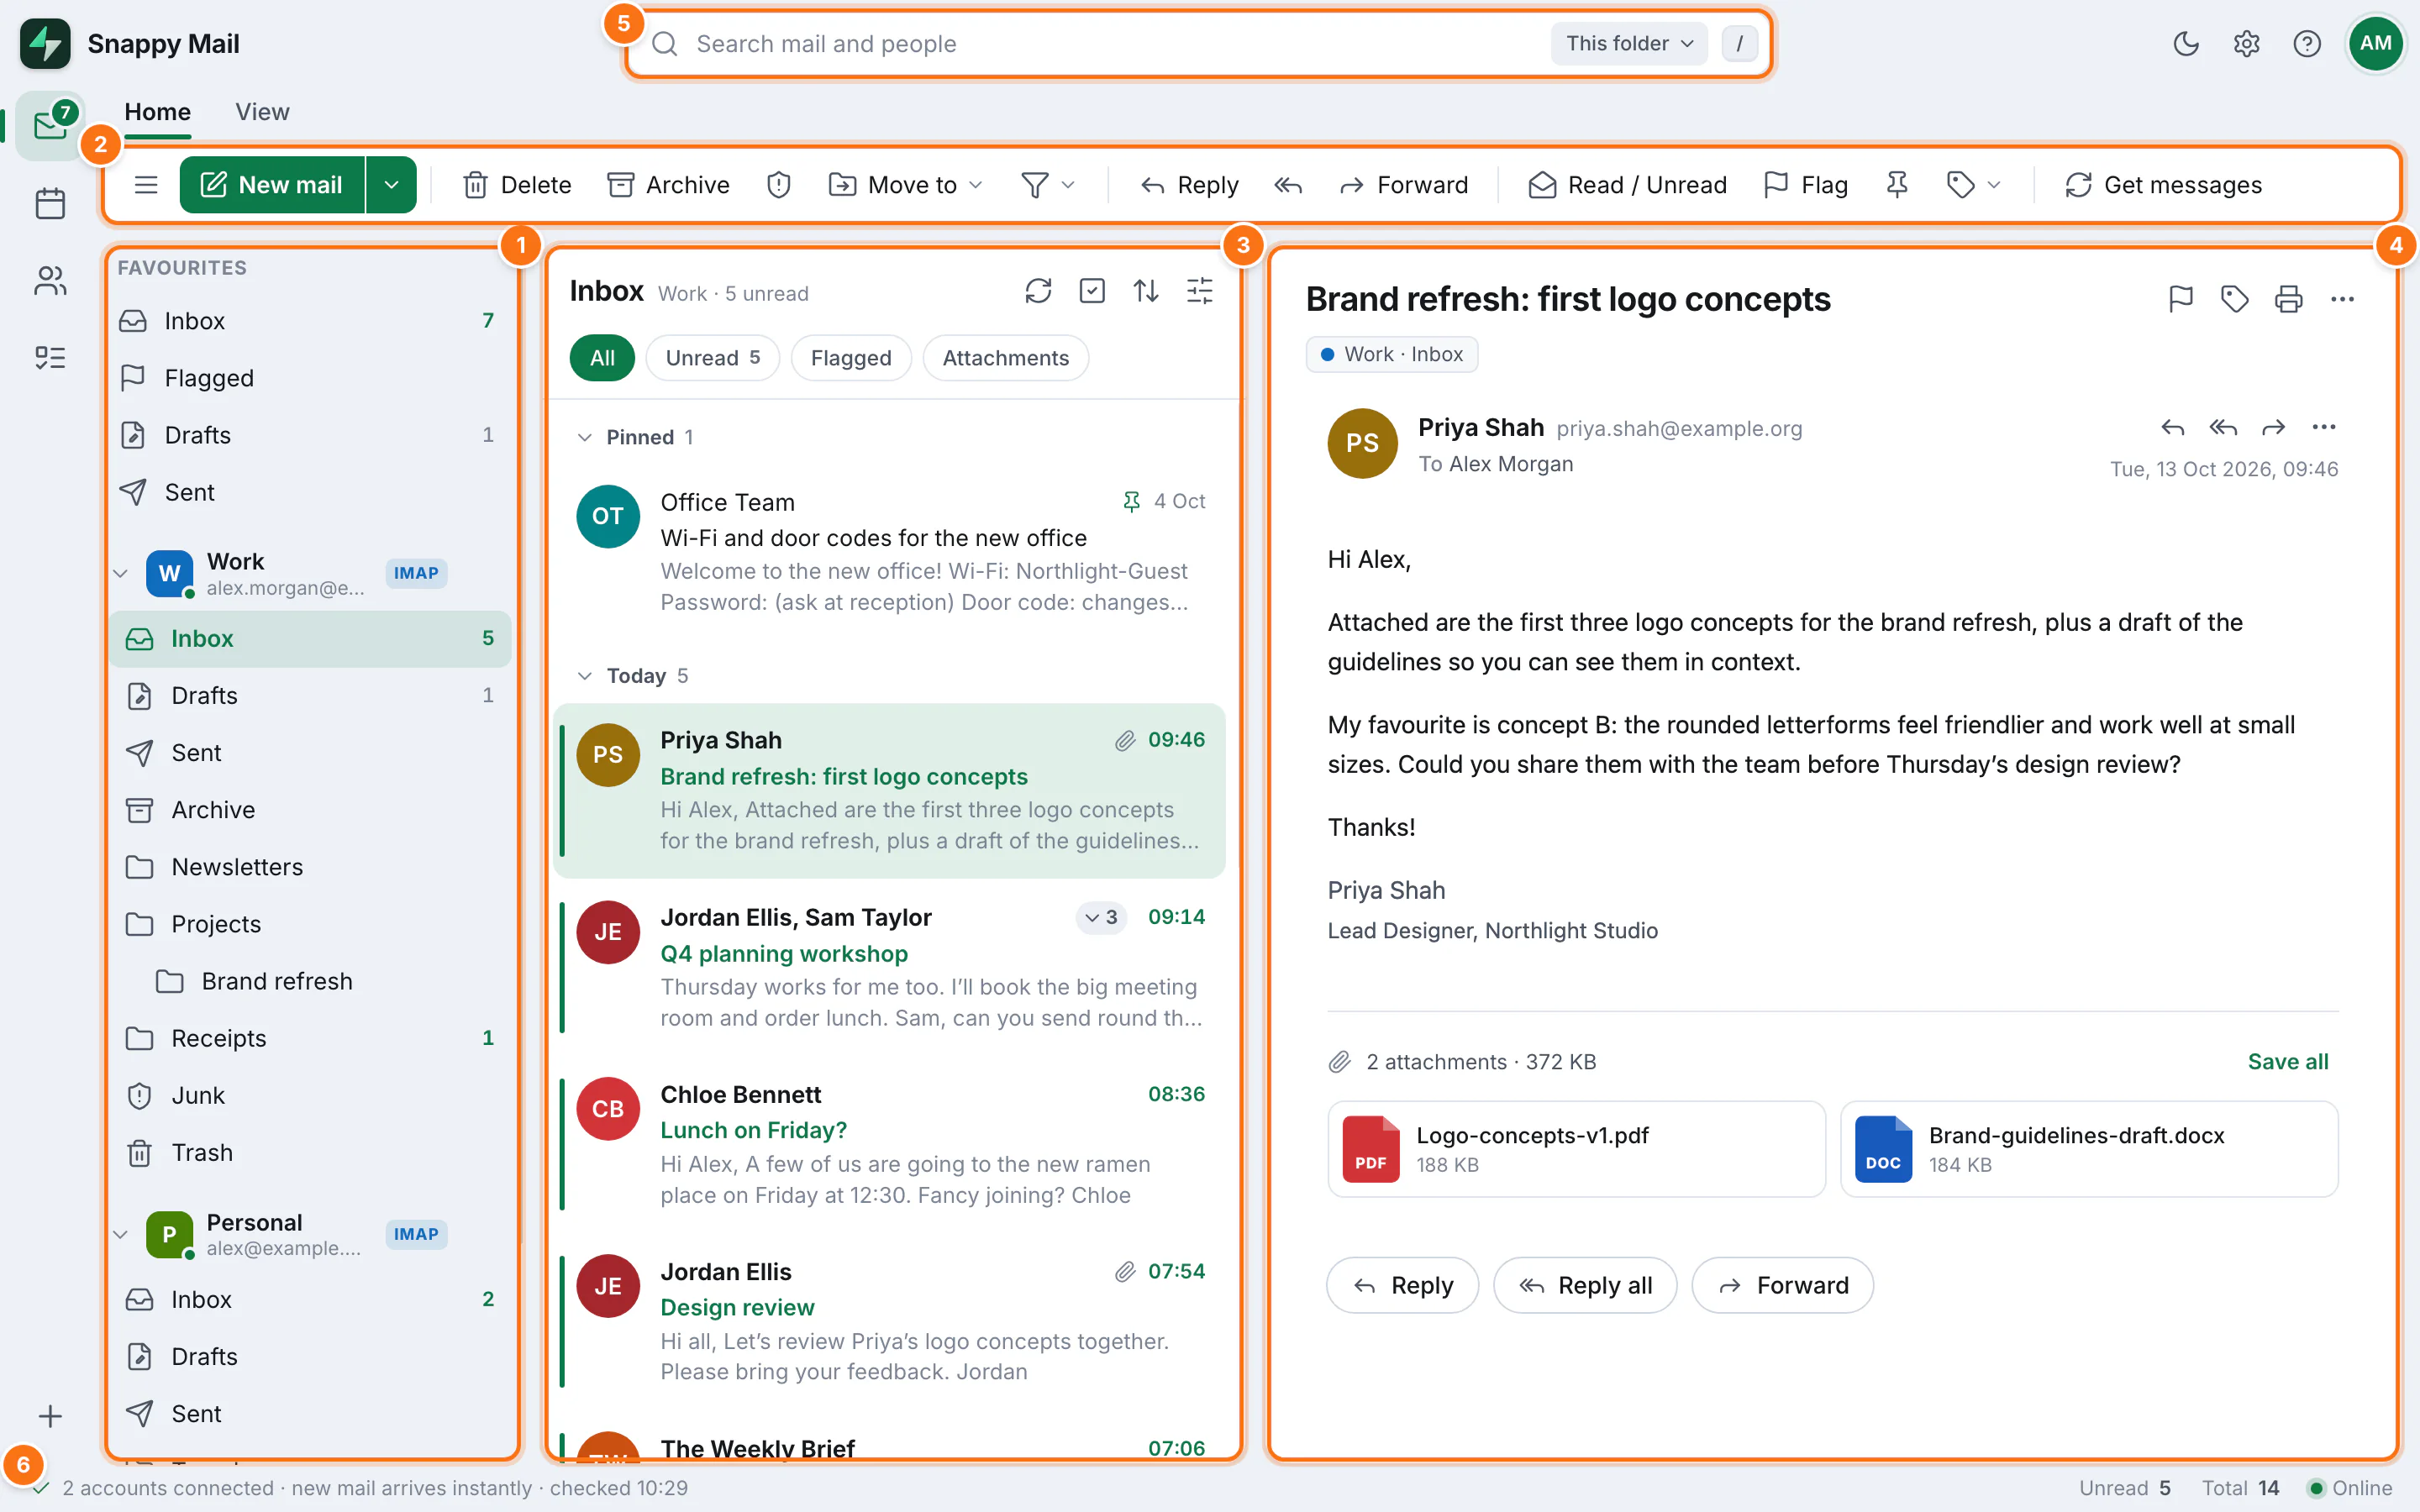
- Folder pane: your favourites, then each account with its folders. Numbers show unread messages.
- Ribbon: buttons for everything you can do with a message. The Home tab is for mail, and the View tab changes the layout.
- Message list: the messages in the folder you're in, newest first and grouped by date.
- Reading pane: the message you've selected.
- Search: find mail by sender, subject or text. Press / to jump here.
- Status bar: whether your accounts are connected, and unread and total counts for the folder.
In the top right are the light/dark switch, Settings (the cog), the keyboard shortcuts list (?) and your accounts.
Favourites and accounts
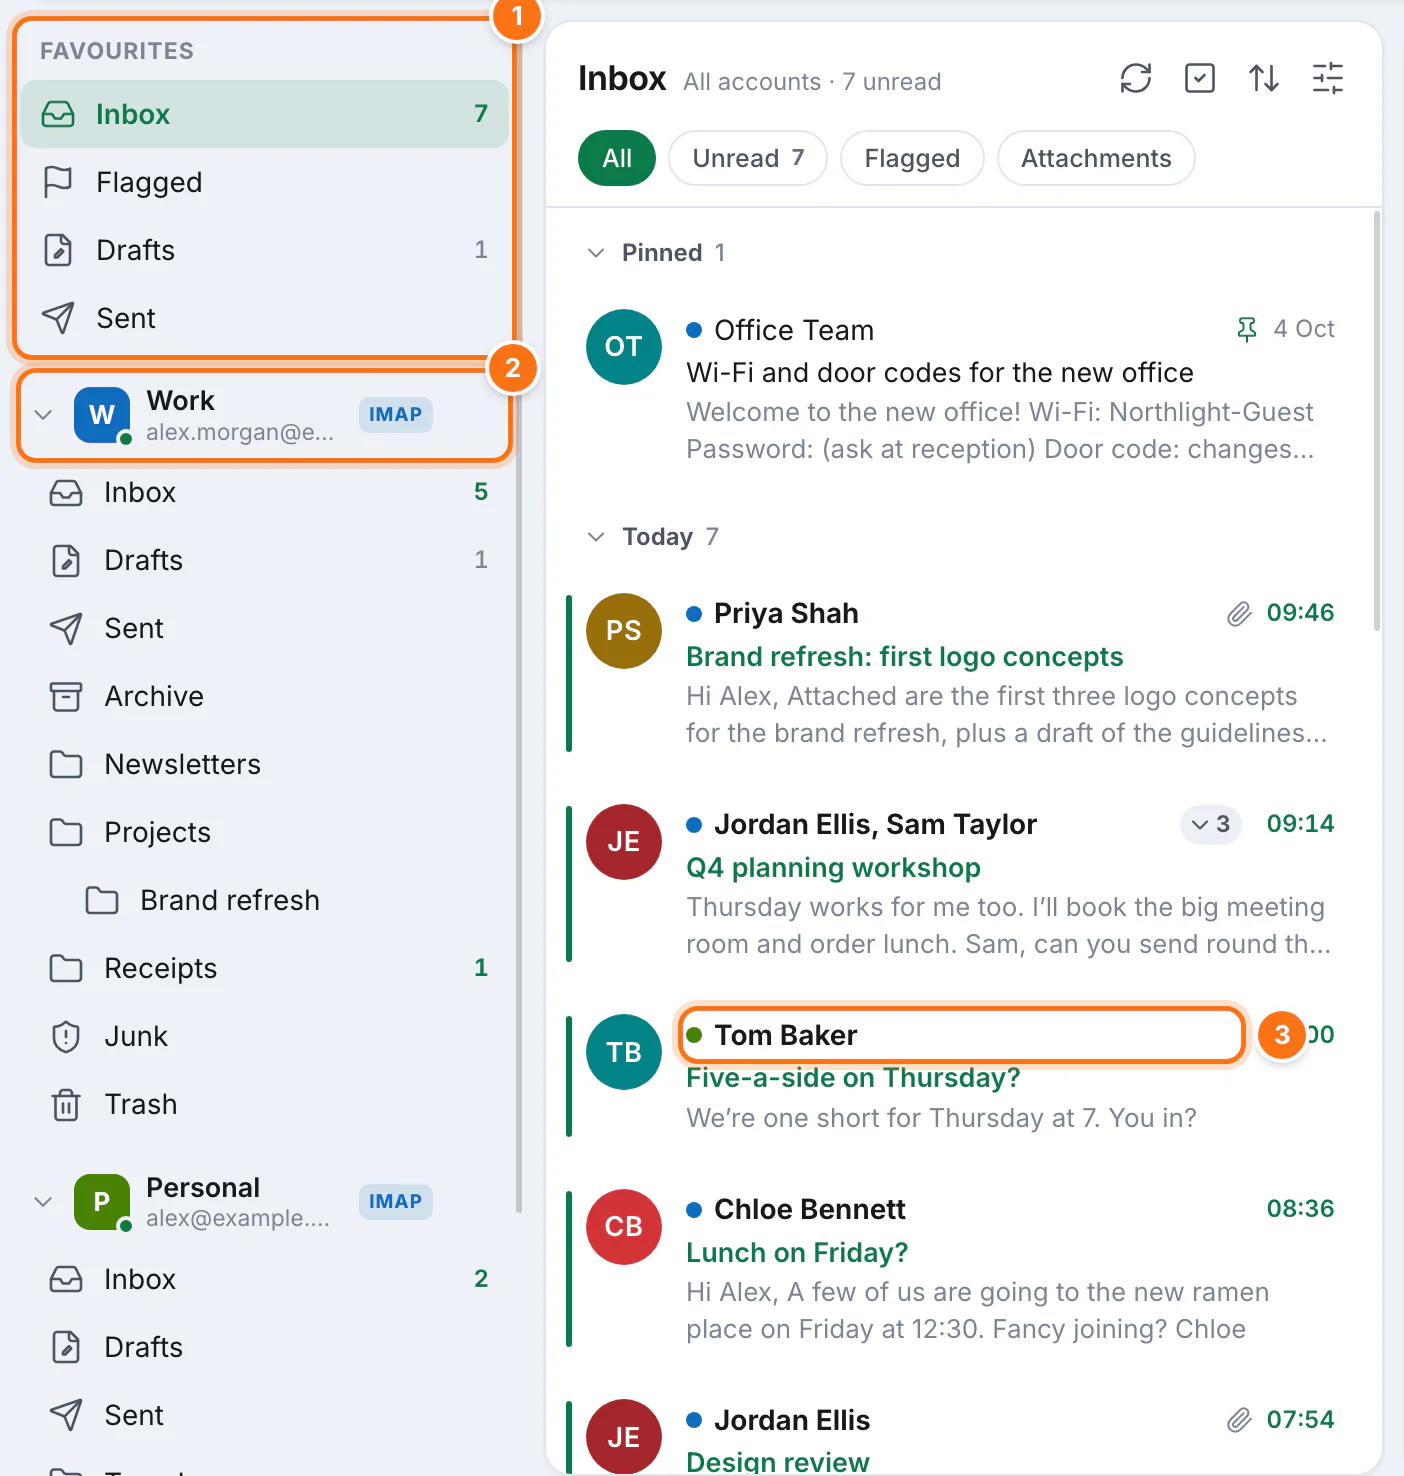
- Favourites combine every account: one Inbox, Flagged, Drafts and Sent for all your mail.
- Each account has its own folders underneath. Click its name to fold the folders away.
- In combined views, a coloured dot before the sender shows which account the message came to.
New mail arrives instantly: Snappy Mail keeps a live connection to each Inbox, so messages appear within a second of reaching your provider. Other folders are checked every few minutes, or click Get messages on the ribbon to check everything now.
3Reading mail
Click a message to read it. Use J and K (or the arrow keys) to move to the next or previous message.
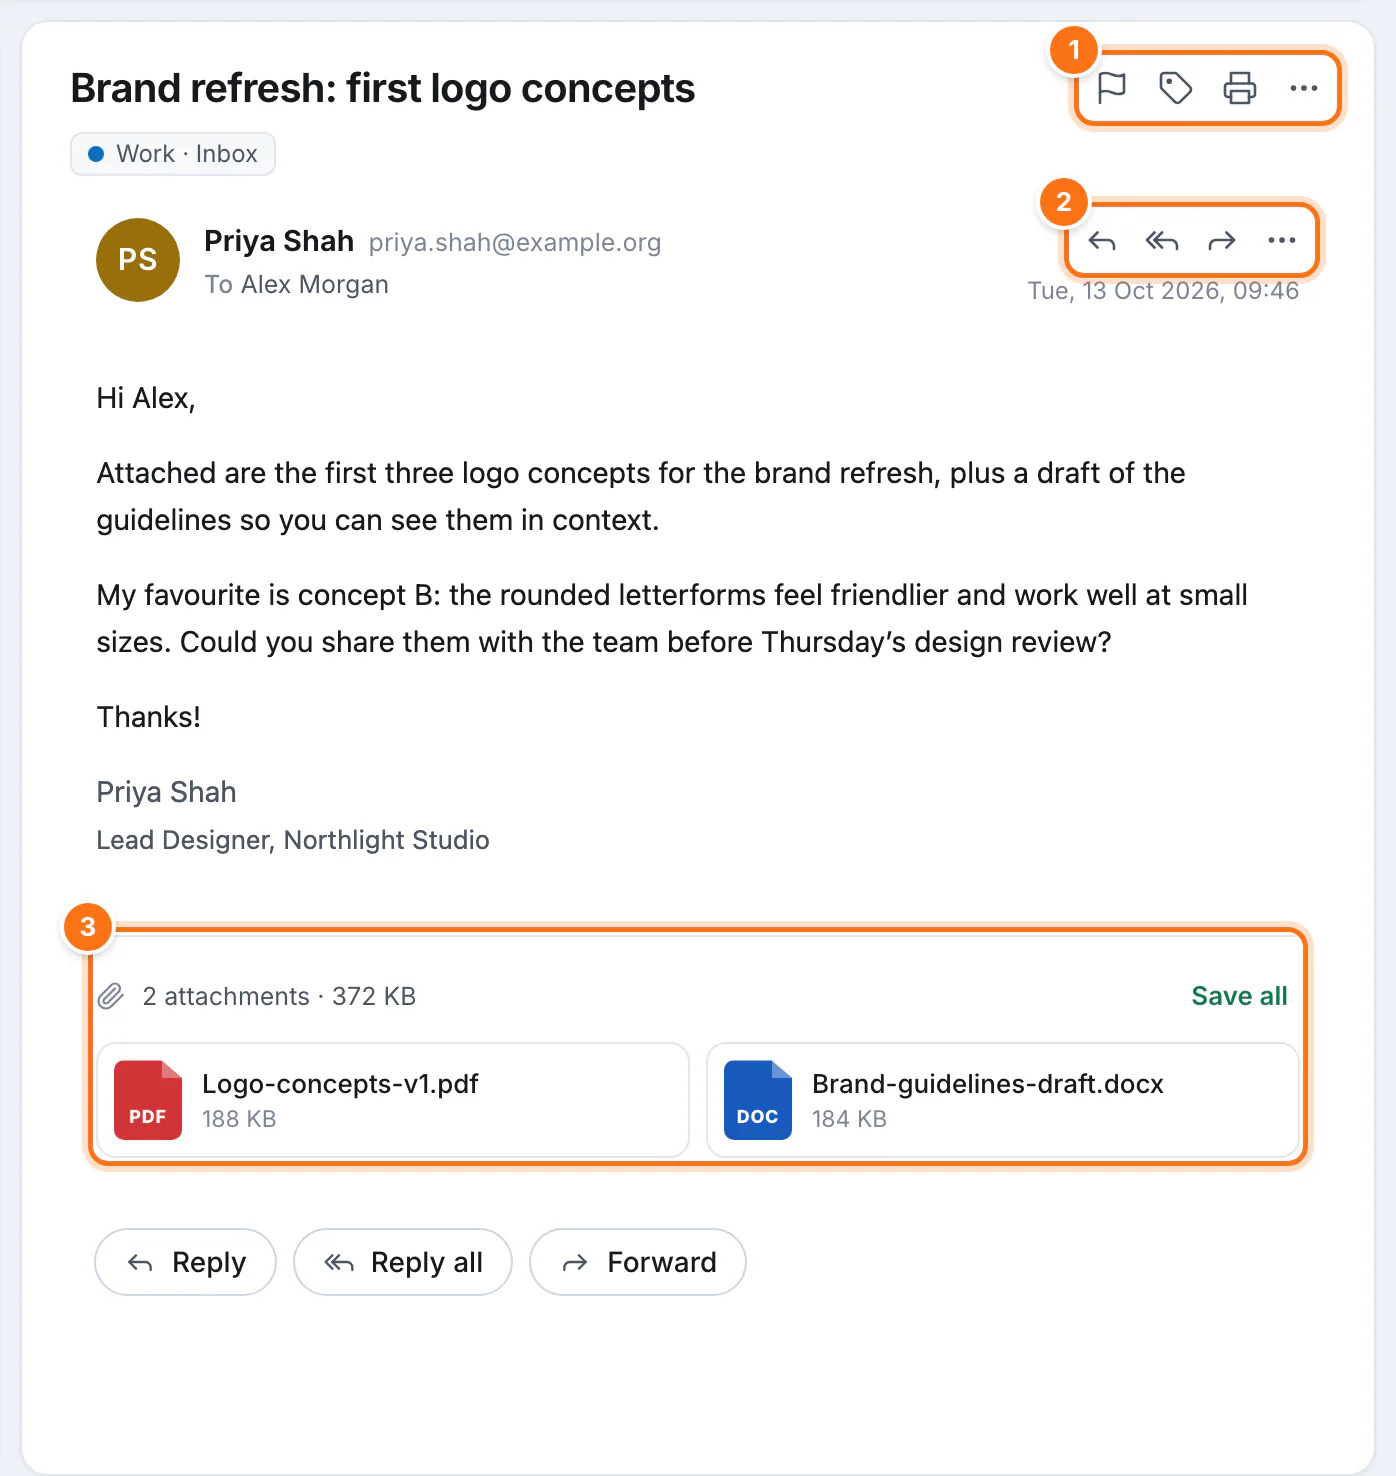
- Message tools: flag, tag, print, and more options such as Mark as unread, Move to, Create rule and View source.
- Reply, reply all, forward for this message. You'll also find big buttons at the end of the message.
- Attachments: click one to open it in the right app on your computer, or use Save all. Programs and scripts are always saved rather than opened, to keep you safe.
Messages are marked as read when you open them. You can change that to After 2 sec or Manually in Settings.
Conversations
Replies are grouped into conversations, so a whole back-and-forth takes up one line in the list.
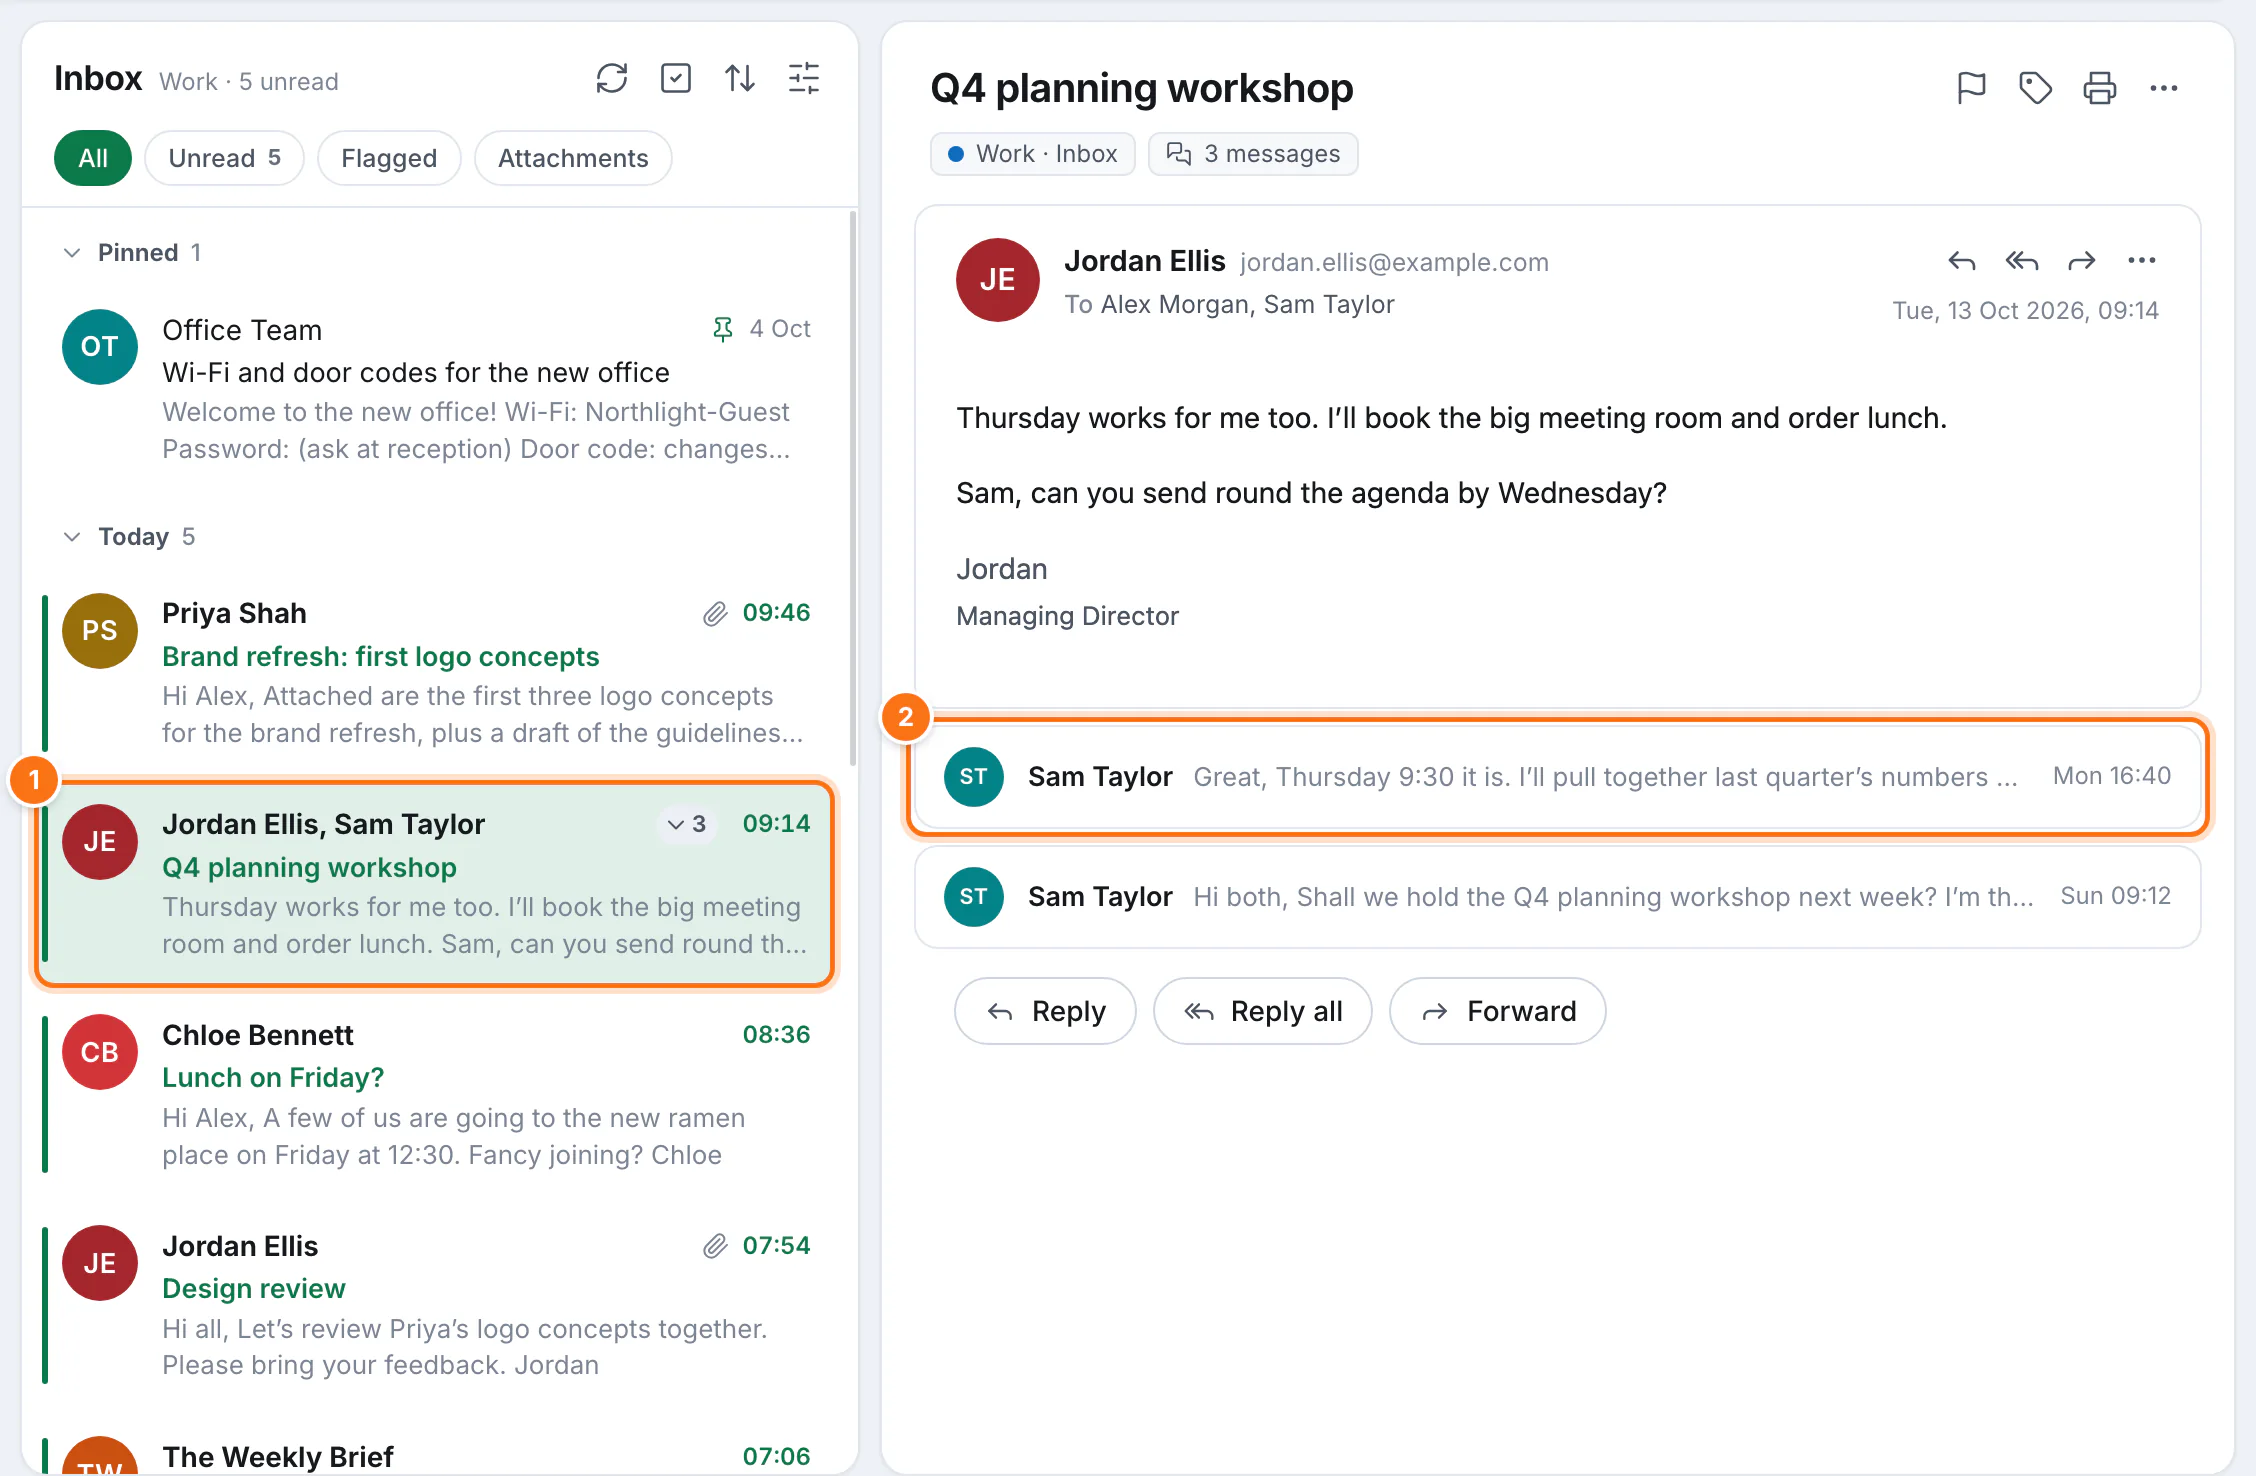
- The number in the list tells you how many messages are in the conversation. Click it to show them all in the list.
- In the reading pane, the newest message is open and earlier ones are folded. Click one to unfold it.
Prefer one line per message? Turn off Conversations on the View tab.
Images and unsubscribing
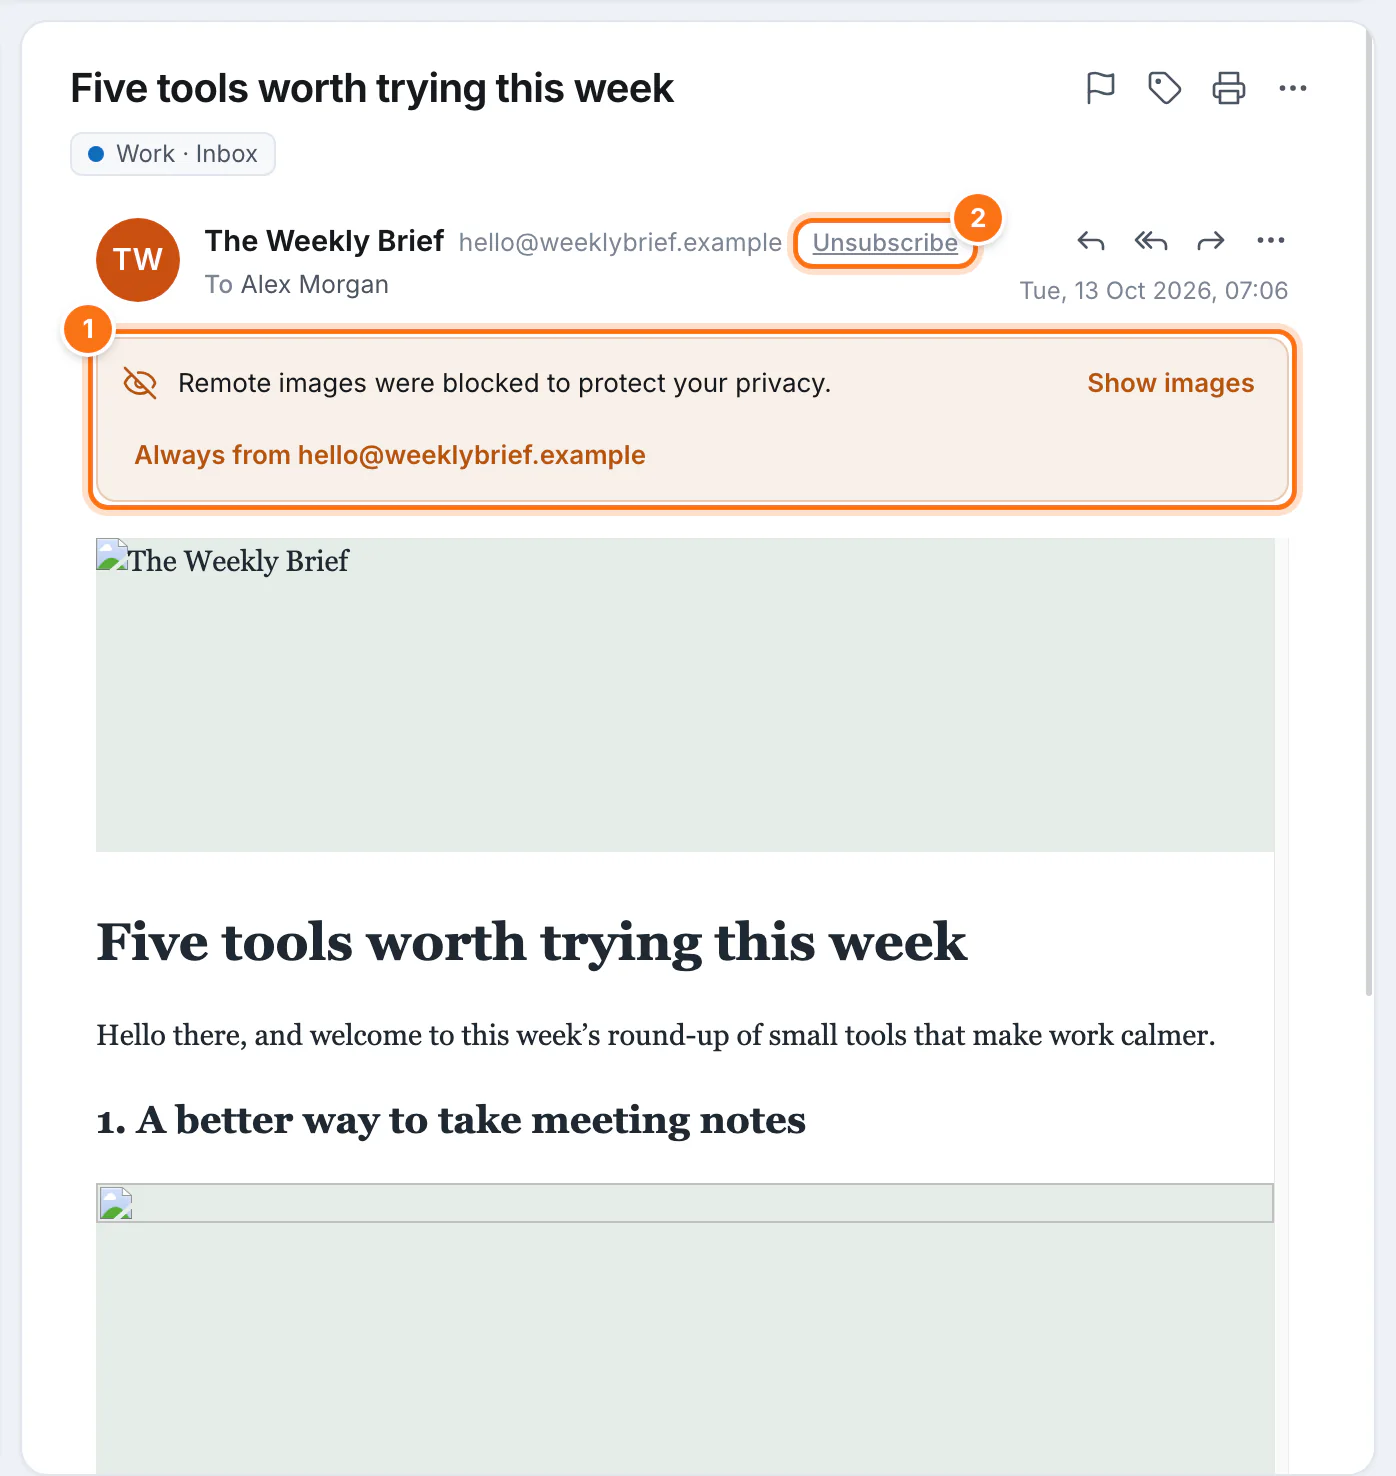
- Pictures stored on the web are blocked until you allow them, because loading them can tell the sender you opened the email. Click Show images for this message, or Always from … to trust that sender from now on.
- Mailing lists get an Unsubscribe link next to the sender. One click opens the sender's unsubscribe page, or starts the unsubscribe email for you.
Meeting invites
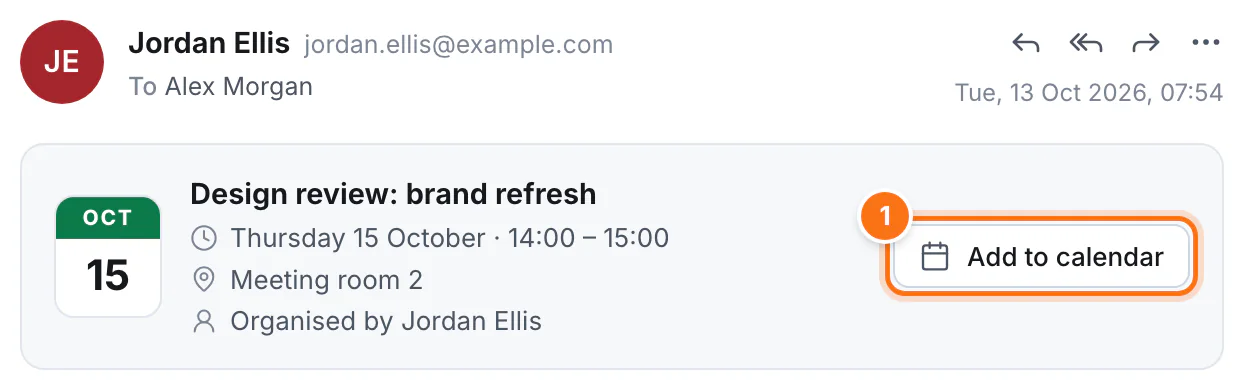
- Click Add to calendar to save the invite and open it in your calendar app.
4Organising mail
Everything you can do to a message is on the ribbon, and on the menu you get when you right-click it (or long-press it on a touch screen).
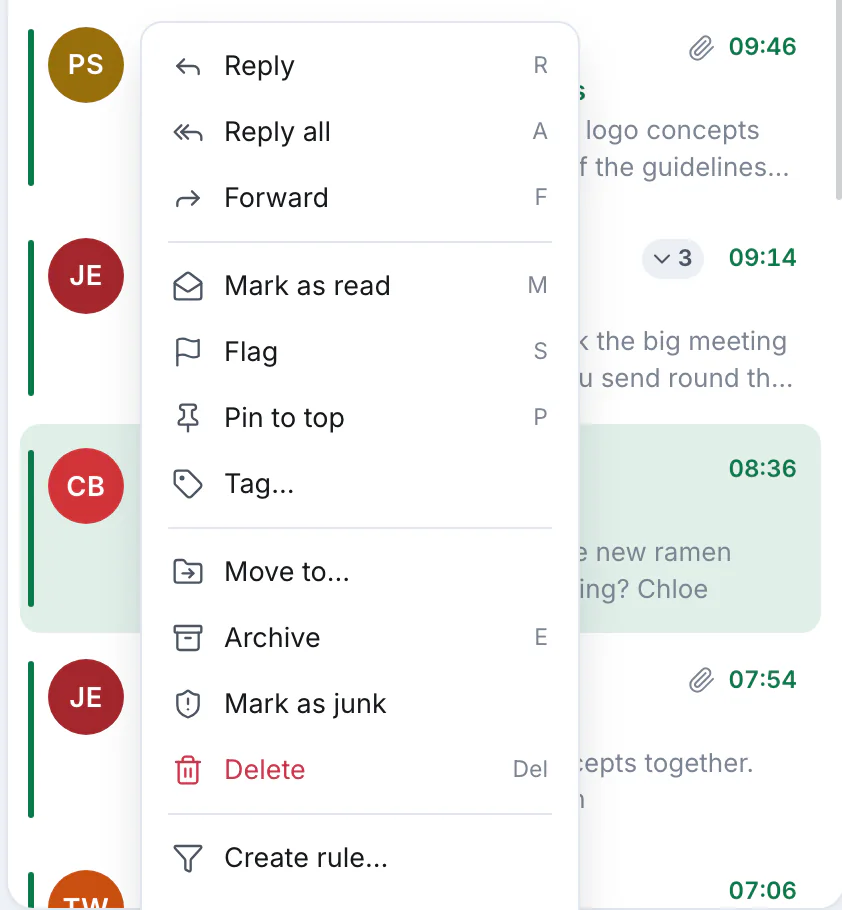
- Archive (E) moves a message to your Archive folder, out of the way but kept.
- Delete (Del) moves it to Trash. Deleting from Trash removes it for good, after asking you first.
- Mark as junk moves it to Junk and tells your provider's spam filter. In Junk, use Not junk to send it back to the Inbox.
- Move to… picks any folder, even in another account. You can also drag messages onto a folder in the folder pane.
- Mark as read / unread (M).
Flags, pins and tags
- Flag (S) marks a message for follow-up. All your flagged mail is in Favourites › Flagged.
- Pin (P) keeps a message at the top of its folder, under “Pinned”.
- Tags (1–5) add a coloured label: Important, Work, Personal, To Do and Later. They're the same tags Thunderbird uses, so they show up there too.
Several messages at once
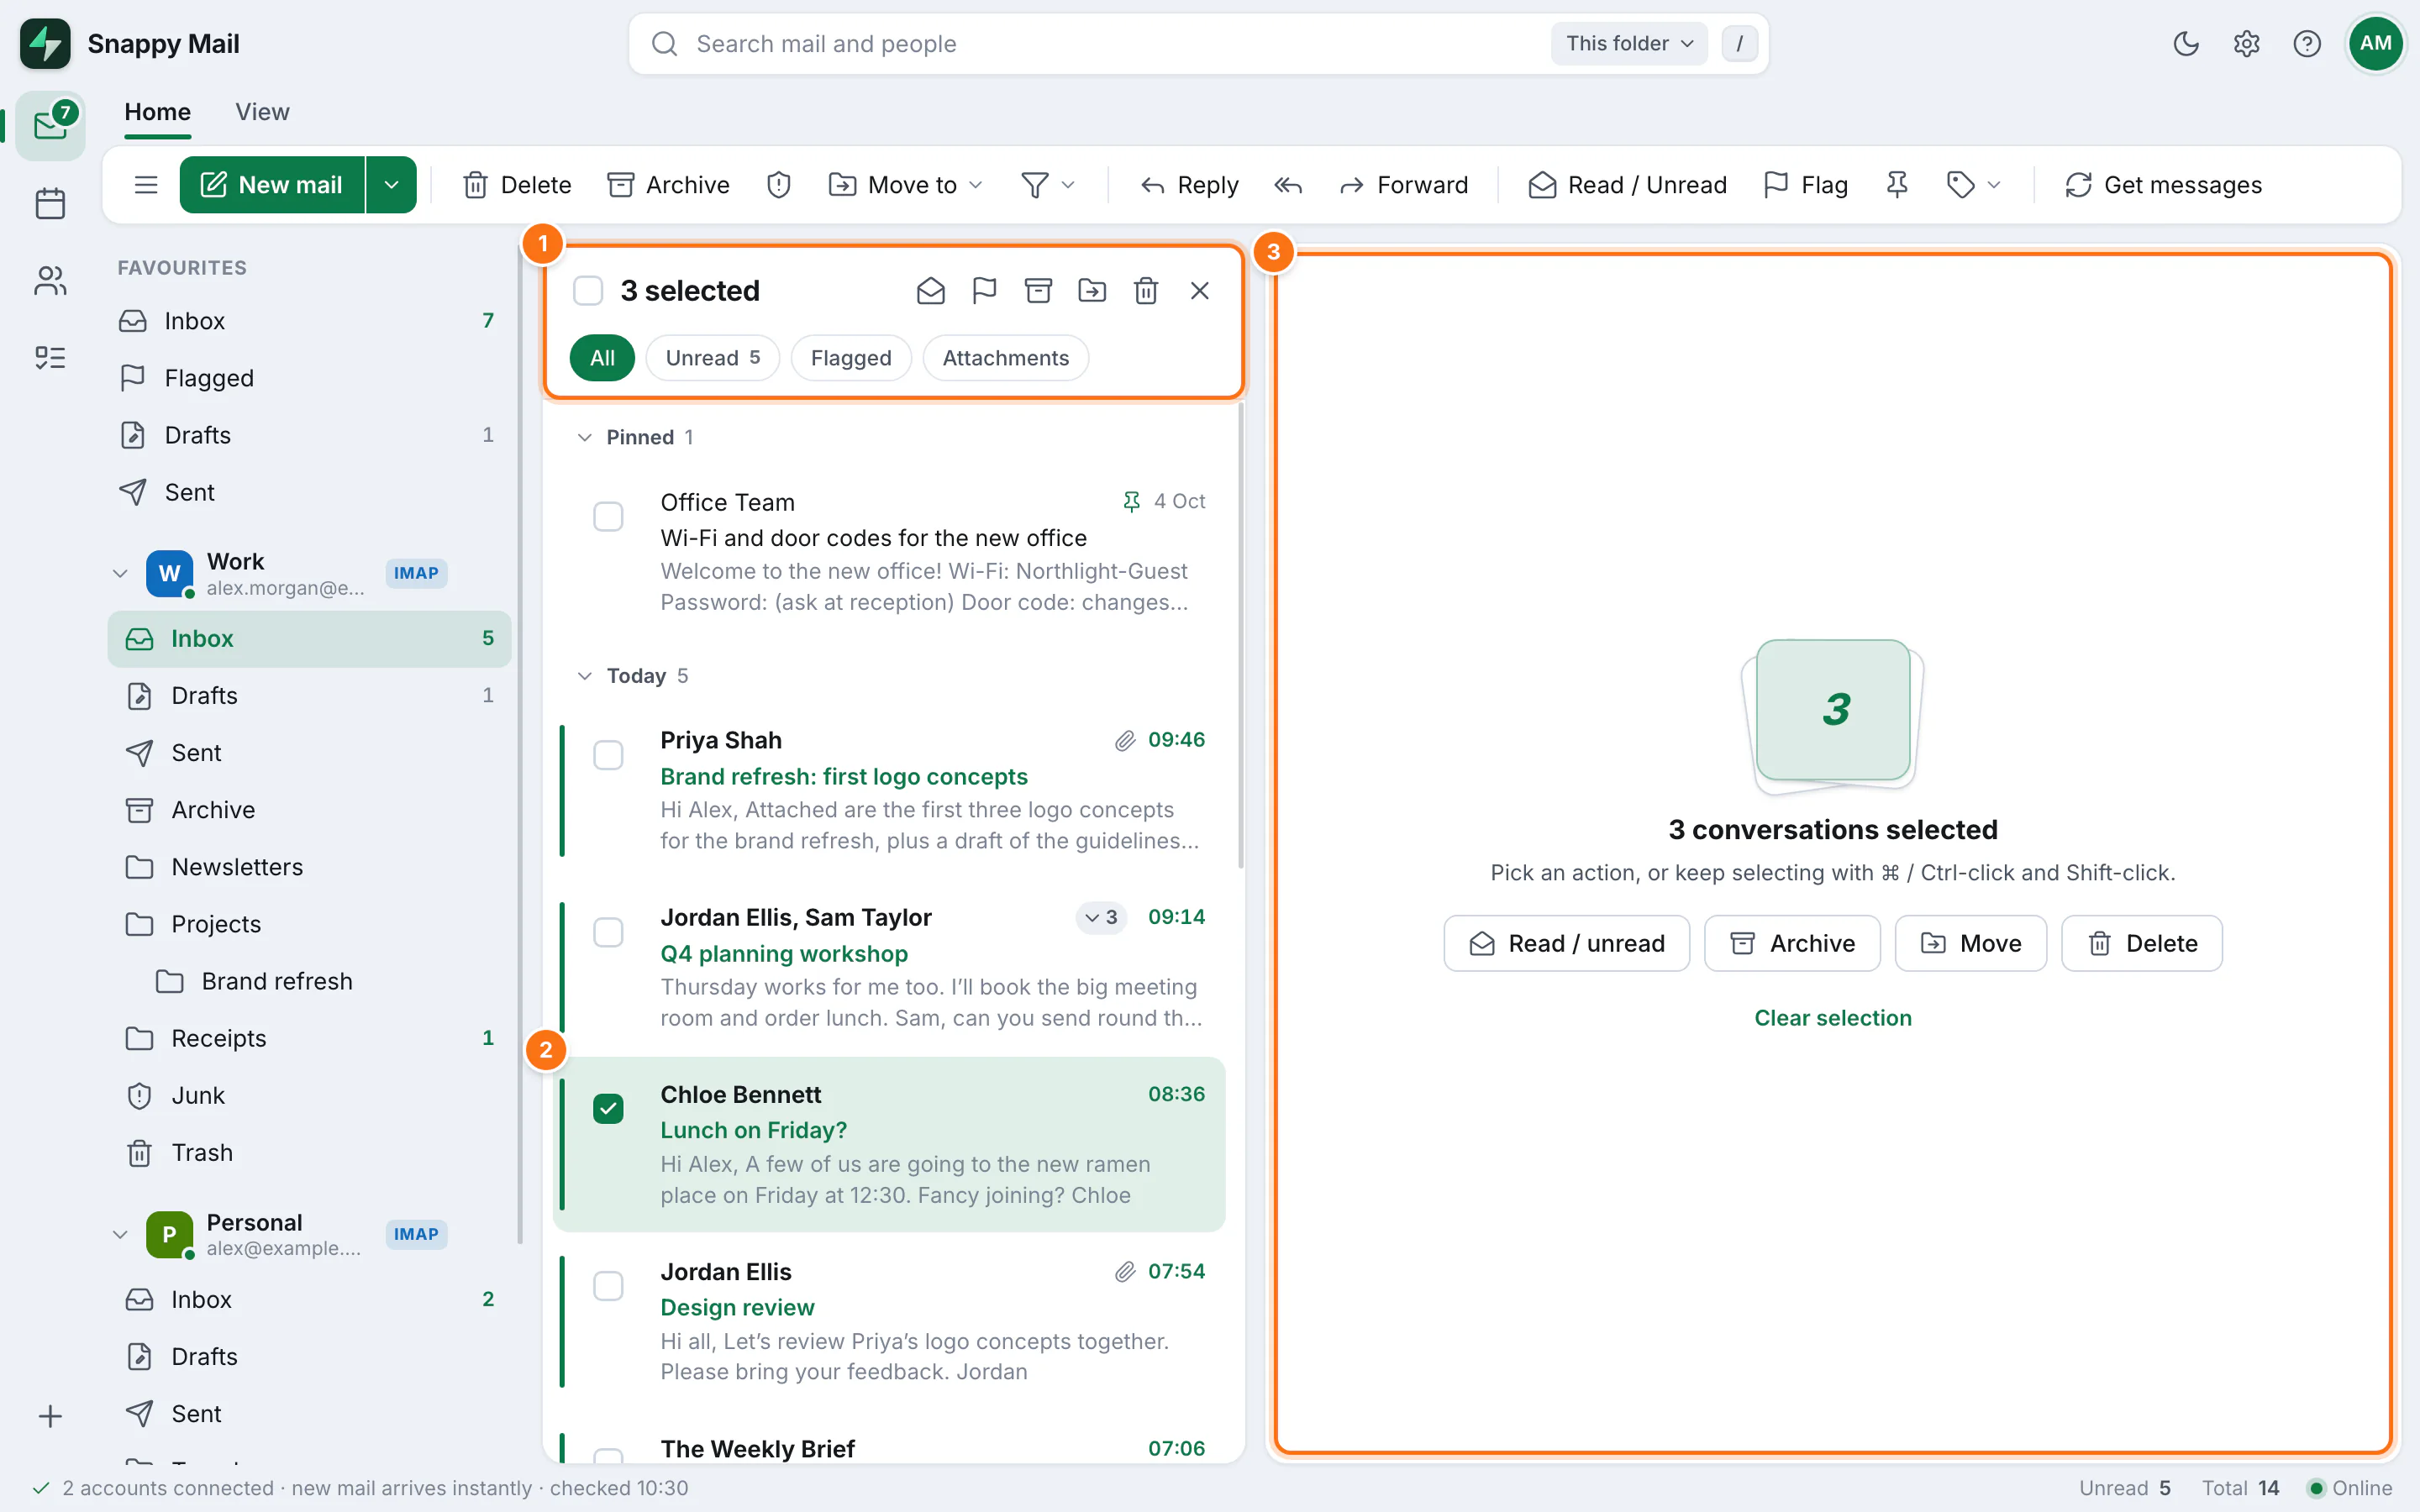
- The list header shows how many you've selected, with quick buttons: read/unread, flag, archive, move and delete.
- Tick the box on each message you want, or hold ⌘/Ctrl and click. Hold Shift and click to select a range.
- The reading pane offers the same actions, and Clear selection.
Undo
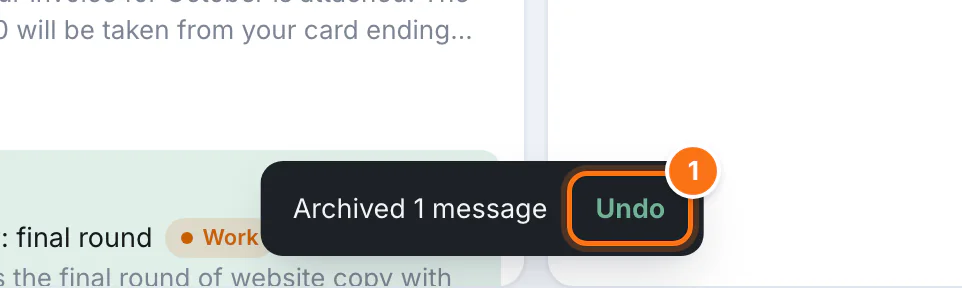
- Whenever you archive, delete or move mail, you can usually click Undo on the message at the bottom of the window to put it back.
Filter and sort the list
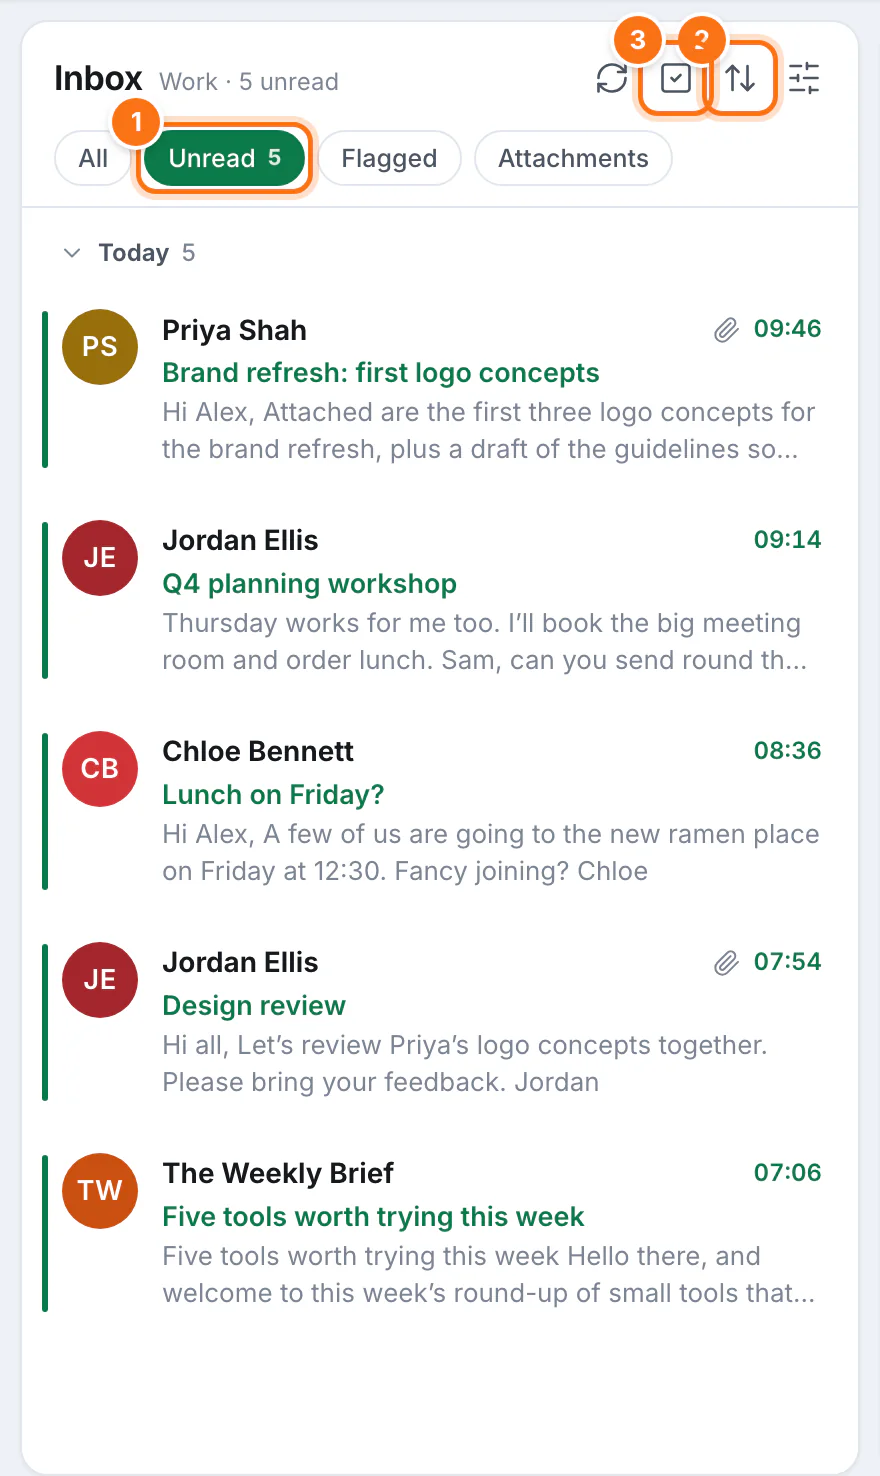
- All, Unread, Flagged and Attachments filter the folder. Unread and Flagged search the whole folder, not just the newest mail.
- Sort by date, sender, subject or size, oldest or newest first.
- Select turns on tick boxes for choosing several messages, which is handy on touch screens.
5Folders
Your folders are the real folders on your mail server, so any change you make shows up in your other mail apps too.
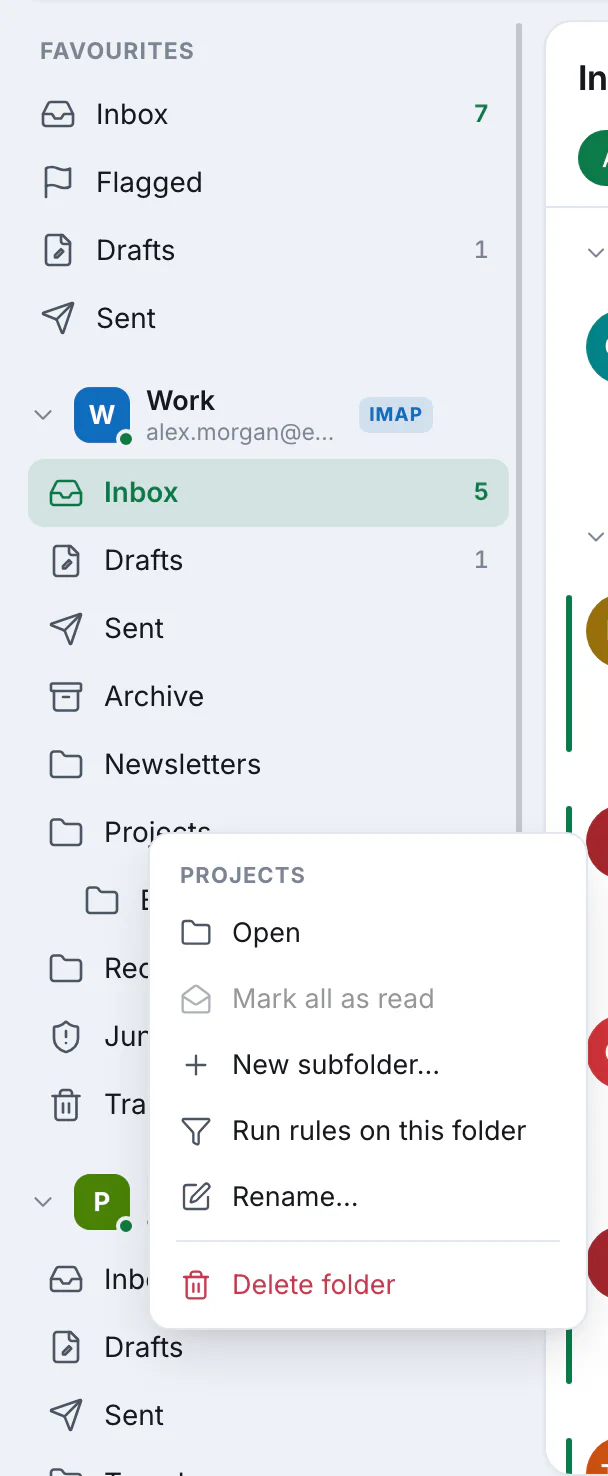
Right-click a folder to:
- mark everything in it as read
- add a subfolder
- run your rules on it
- rename or delete it (your own folders only)
- empty Trash or Junk
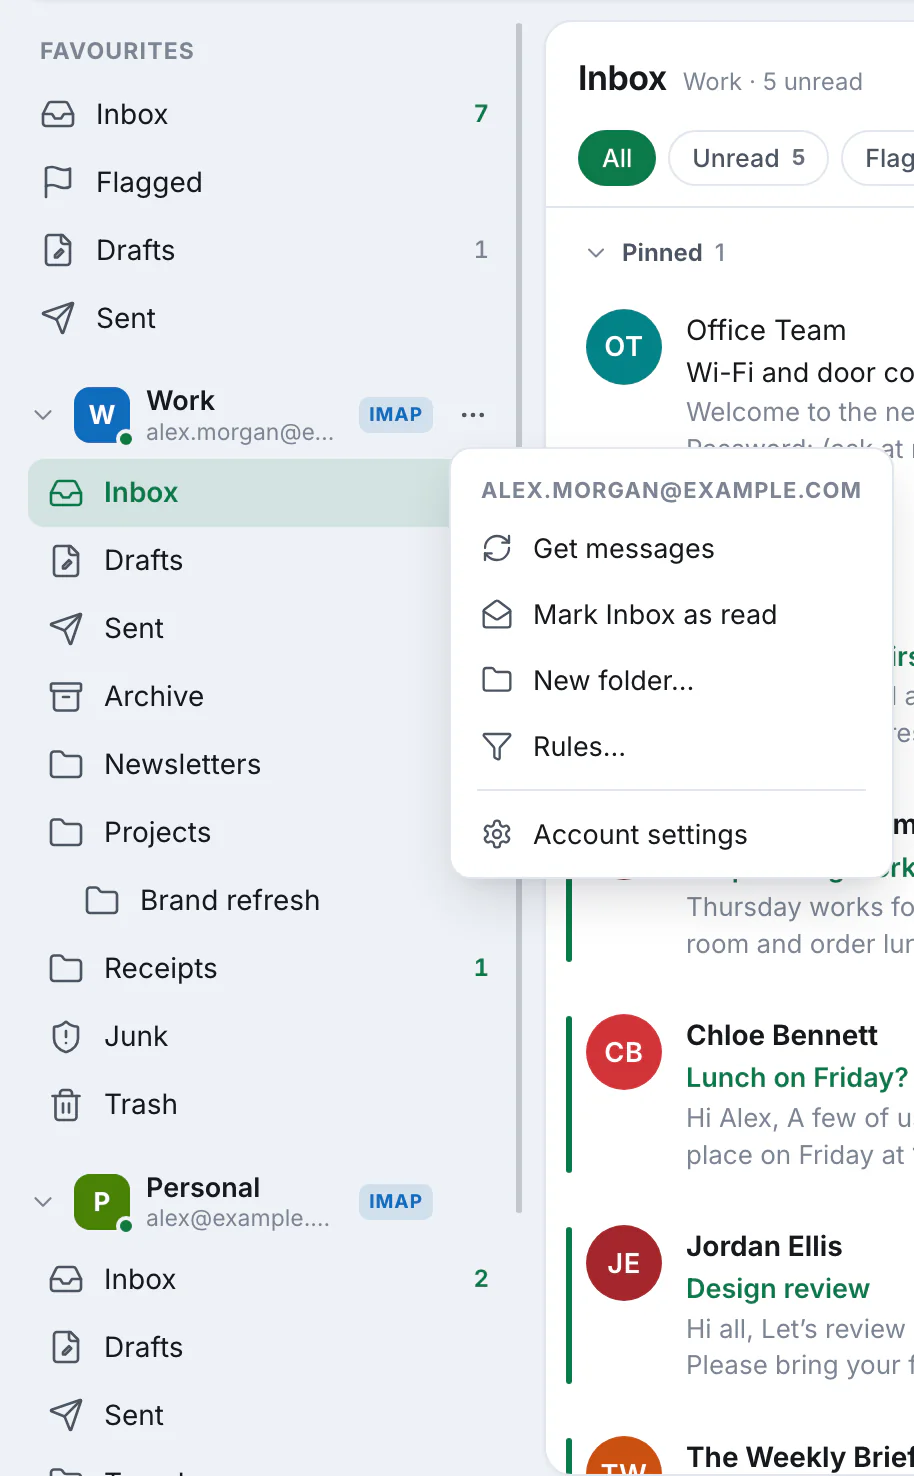
Click ⋯ next to an account to check for new mail, mark its Inbox as read, add a top-level folder, open its rules, or change its settings.
Special folders (Inbox, Drafts, Sent, Archive, Junk, Trash) are found automatically and get their own icons. If your account doesn't have one yet, Snappy Mail creates it the first time it's needed.
6Searching
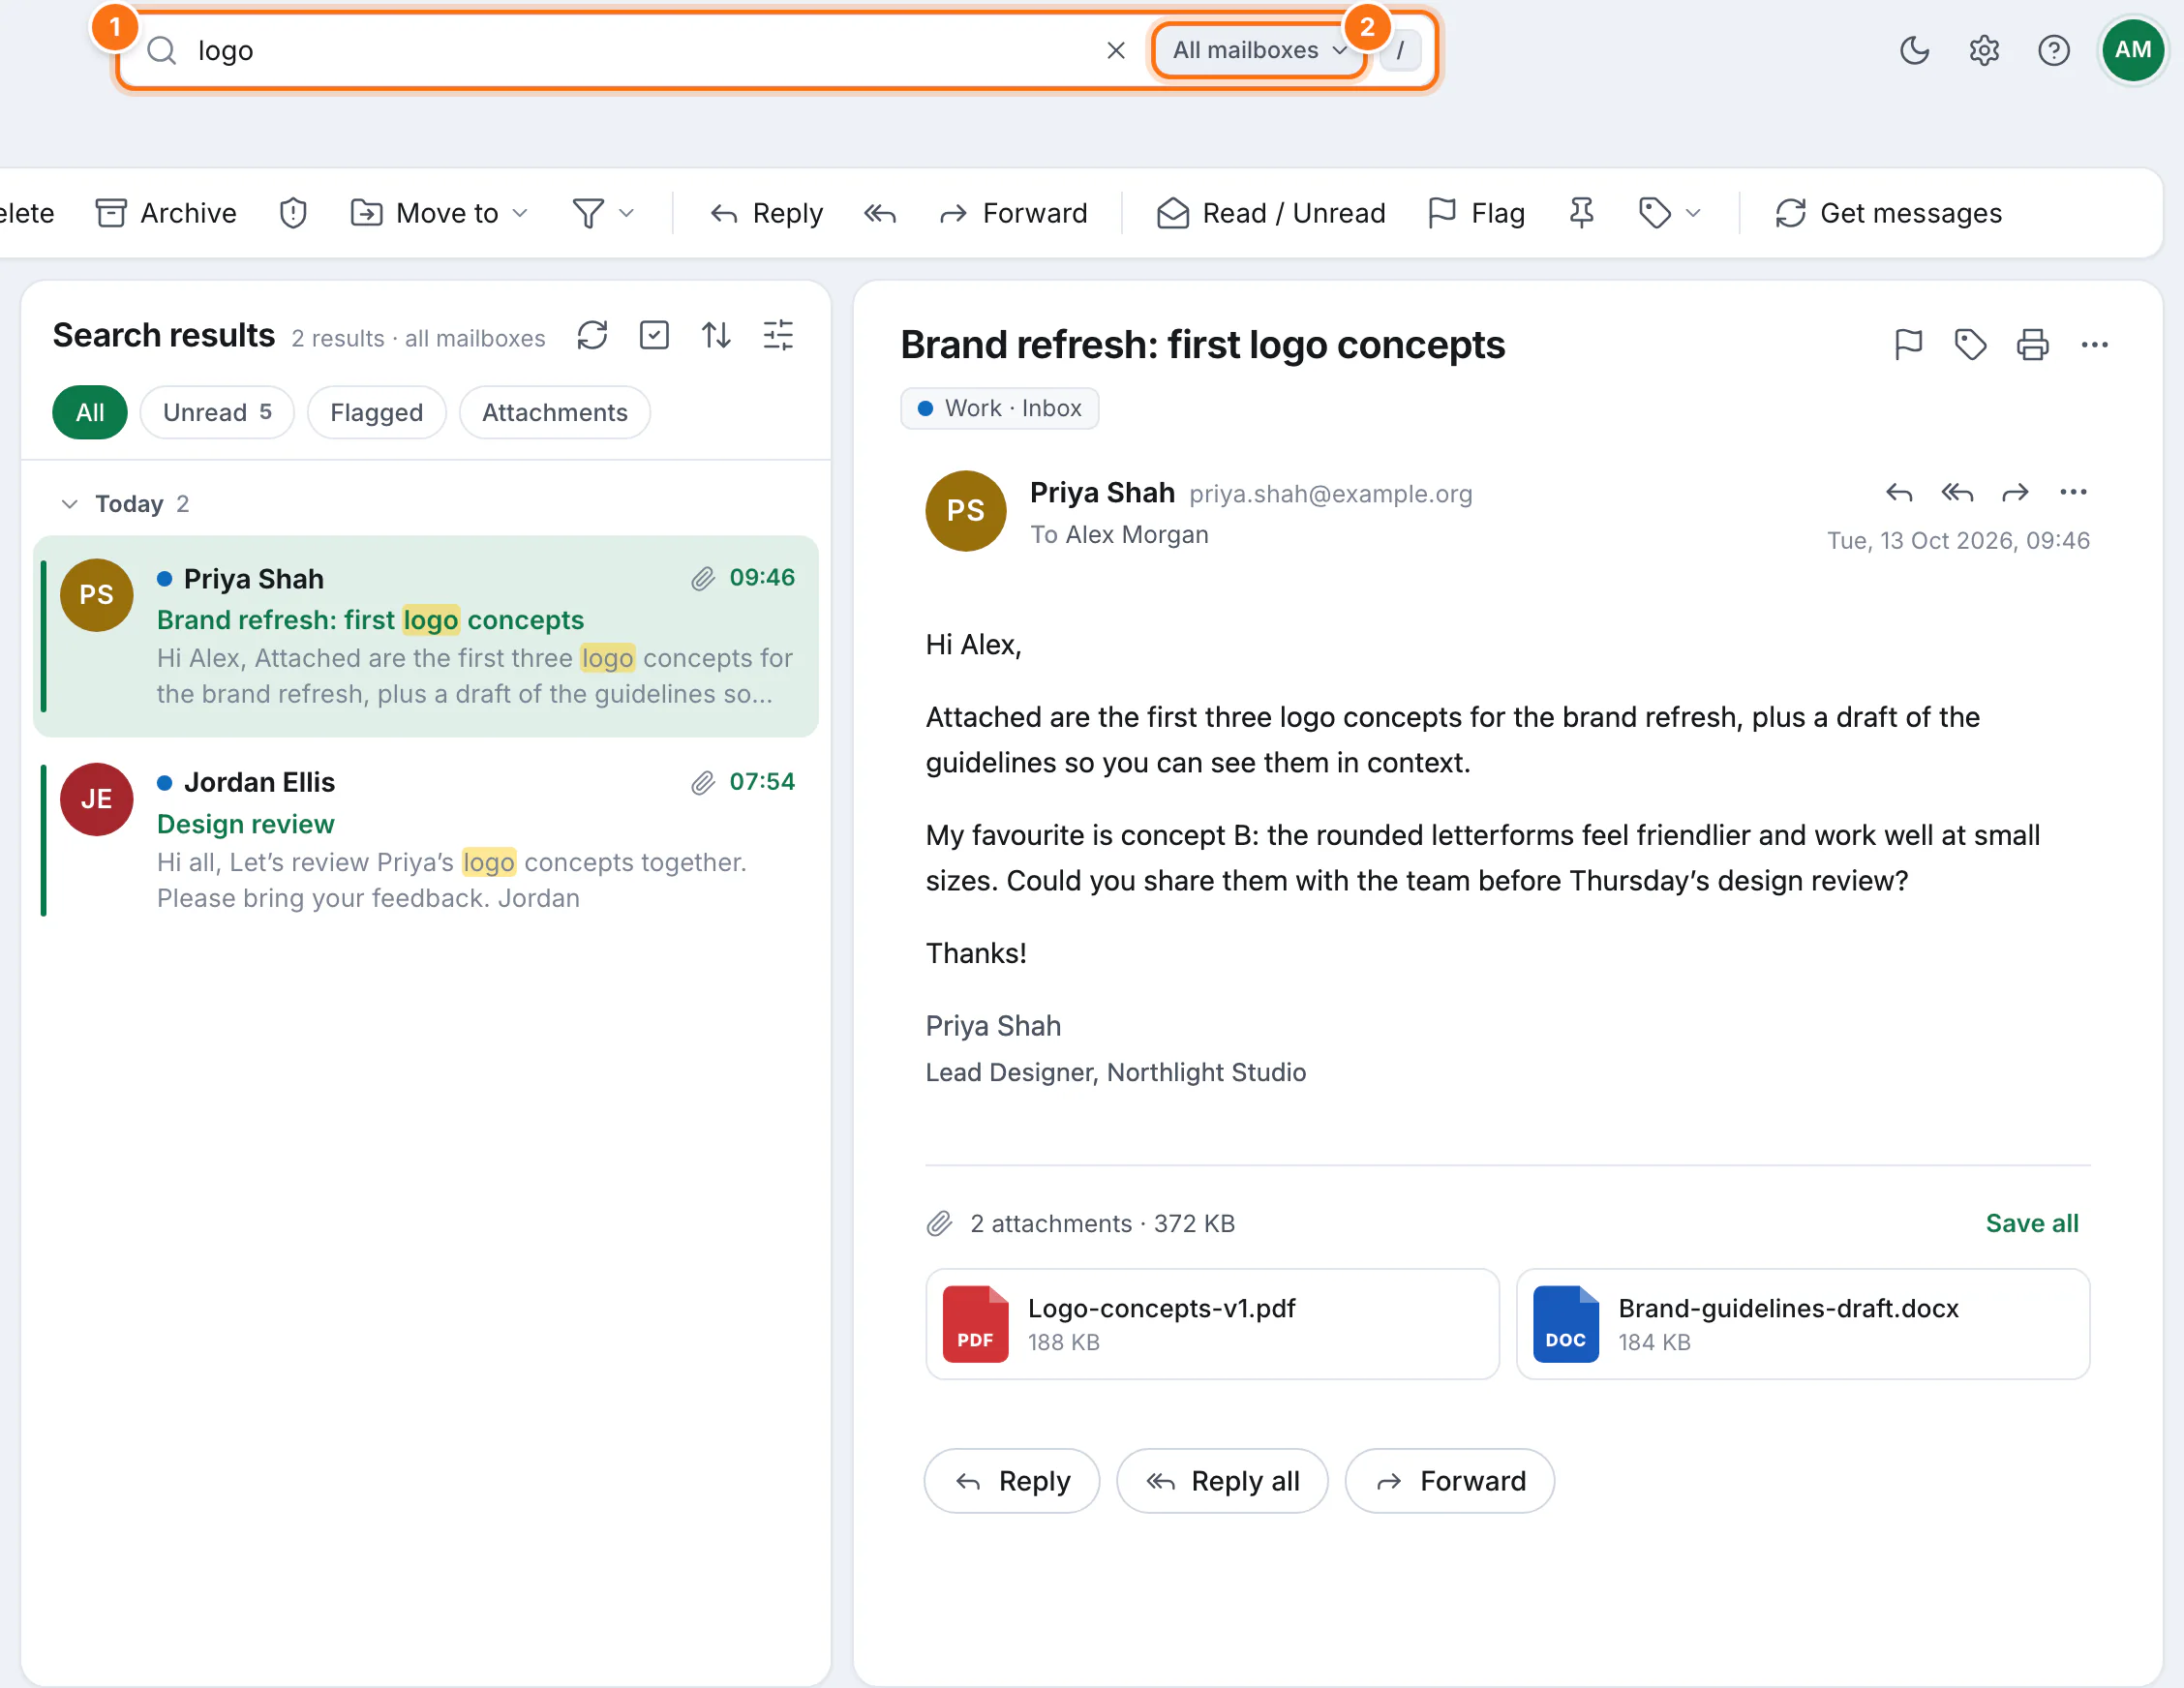
- Type in the search box, or press / to jump to it. Messages you've already loaded filter instantly, then your mail server is searched for everything else: senders, recipients, subjects and message text.
- Choose where to look: This folder or All mailboxes, which searches every folder in every account (apart from Junk and Trash).
Press Enter or ↓ to jump into the results, and Esc to clear the search.
7Writing email
Click New mail on the ribbon, or press N. The message opens in its own window in the corner, so you can still read other mail while you write.
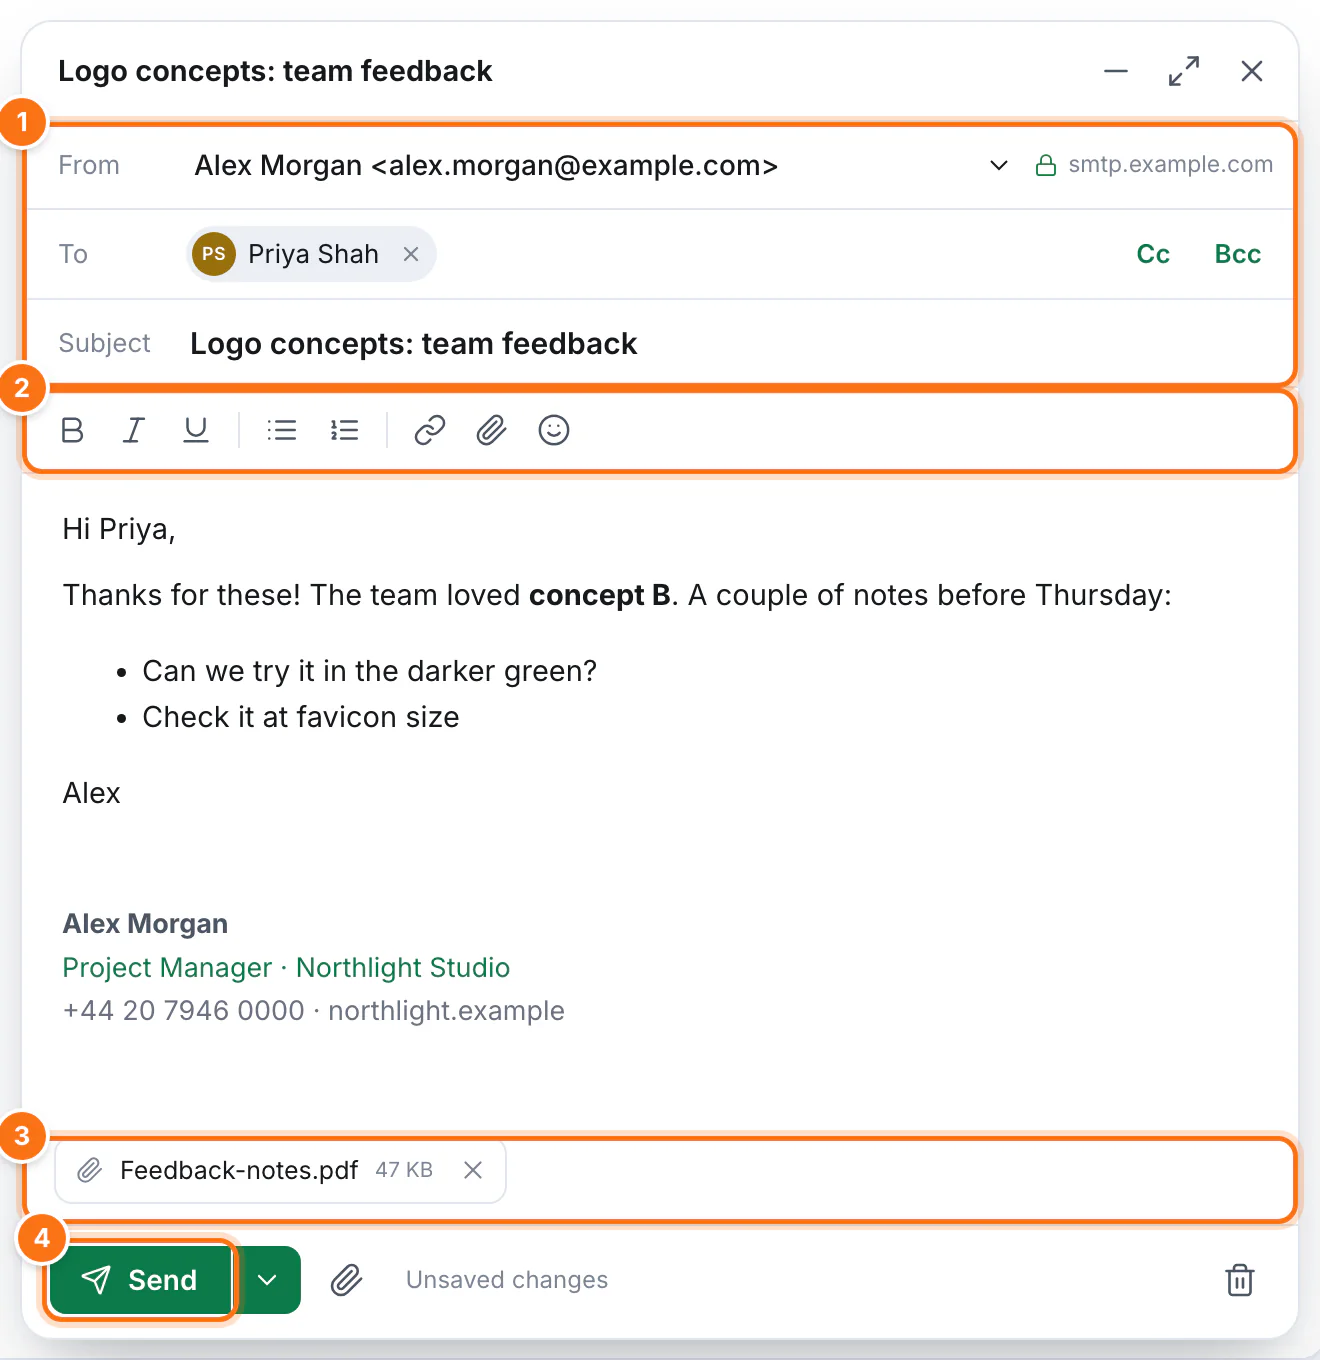
- From, To and Subject. If you have more than one account, choose which one to send from. Start typing a name or address and pick from the suggestions; press Enter or type a comma to add it. Cc and Bcc add more fields.
- Formatting: bold, italic, underline, lists, links, attachments and emoji. You can also paste formatted text and pictures straight into the message.
- Attachments appear here. Click the paperclip, or drag files onto the window. The × removes one.
- Send, or press ⌘/Ctrl + Enter.
Use the buttons at the top of the window to minimise it to a small bar or expand it to fill the screen.
Reply and forward
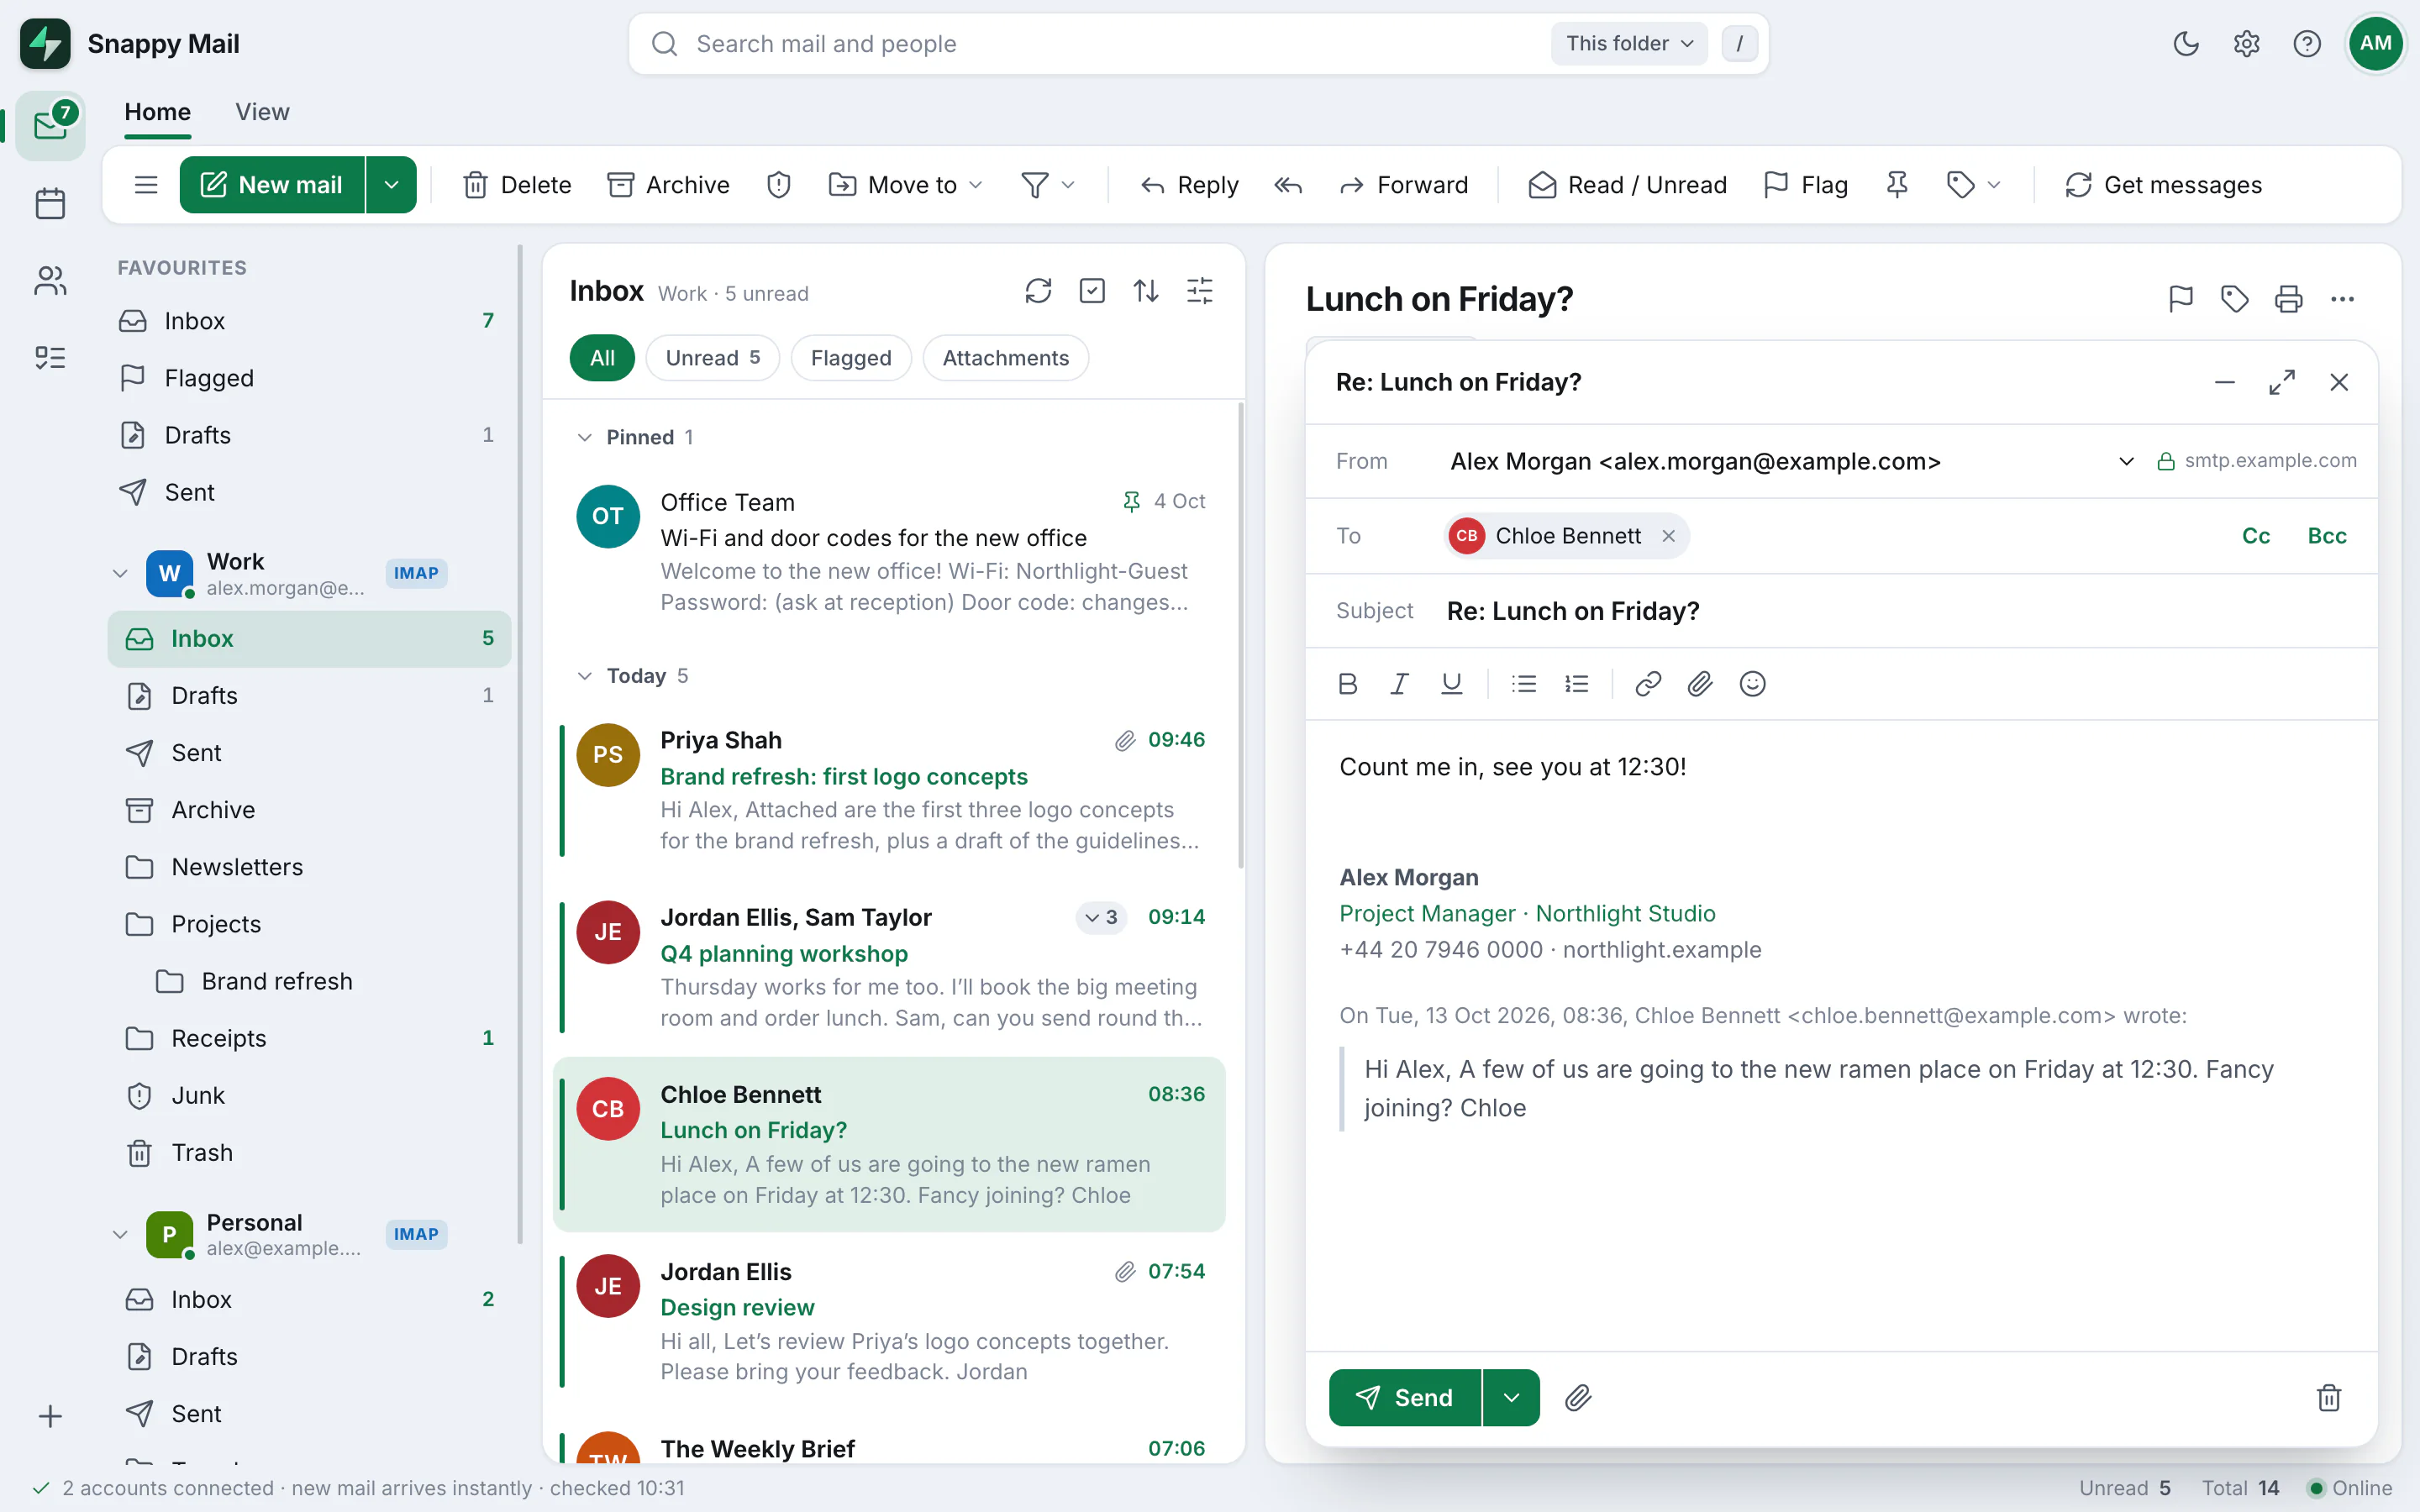
Open a message and click Reply (R), Reply all (A) or Forward (F). The original message is quoted underneath your reply. Forwarding includes the original attachments, and the original message is marked as replied to or forwarded.
Drafts and undo send
- Drafts save themselves to your account's Drafts folder a few seconds after you stop typing. Closing the window keeps the draft too. Open it from Drafts and click Continue editing to carry on.
- Undo send: for 5 seconds after you click Send, you can click Undo to get the message back and keep editing.
- A copy of everything you send is saved in Sent. (Gmail does this itself, so Snappy Mail doesn't save a second copy.)
8Signatures
Each account can have its own signature, with formatting, links and a logo. Open Settings (the cog, top right), then choose the account under Signatures.
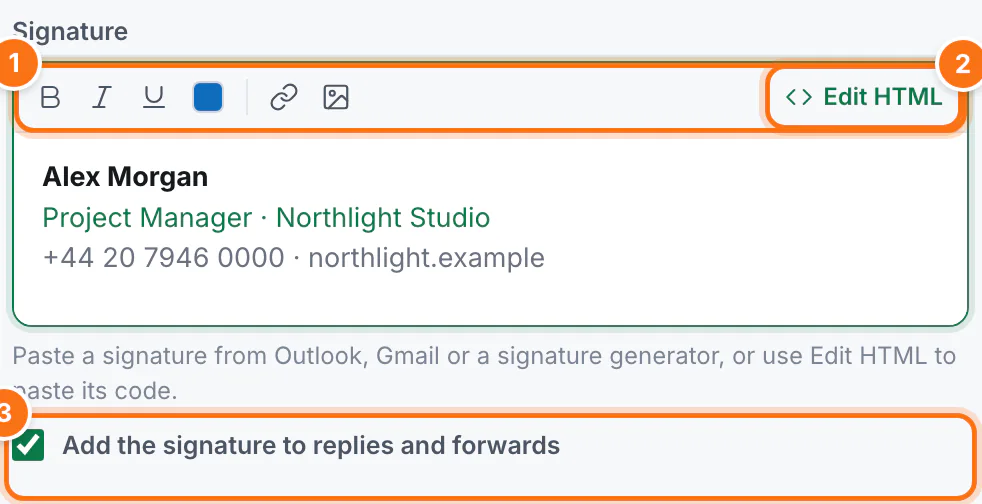
- Format the text, pick a colour, add a link, or add an image such as your logo. Large images are shrunk to signature size for you.
- Edit HTML lets you paste a signature made with a signature generator or copied from another mail app.
- Choose whether replies and forwards get your signature too, or only new messages.
Click Save at the bottom of the window. Your signature is added automatically when you write a message, and you can still edit it in each email.
9Rules
Rules sort your mail for you, like Thunderbird's message filters or Outlook's rules. Move newsletters into a folder, flag mail from the people who matter, tag receipts, or clear out old mail.
Create a rule
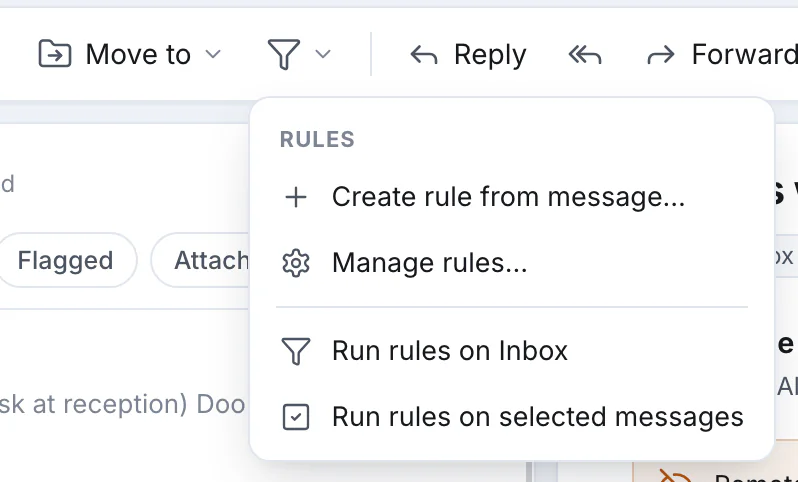
The quickest way: right-click a message and choose Create rule…. The rule starts out matching that sender. You can also use Rules on the ribbon.
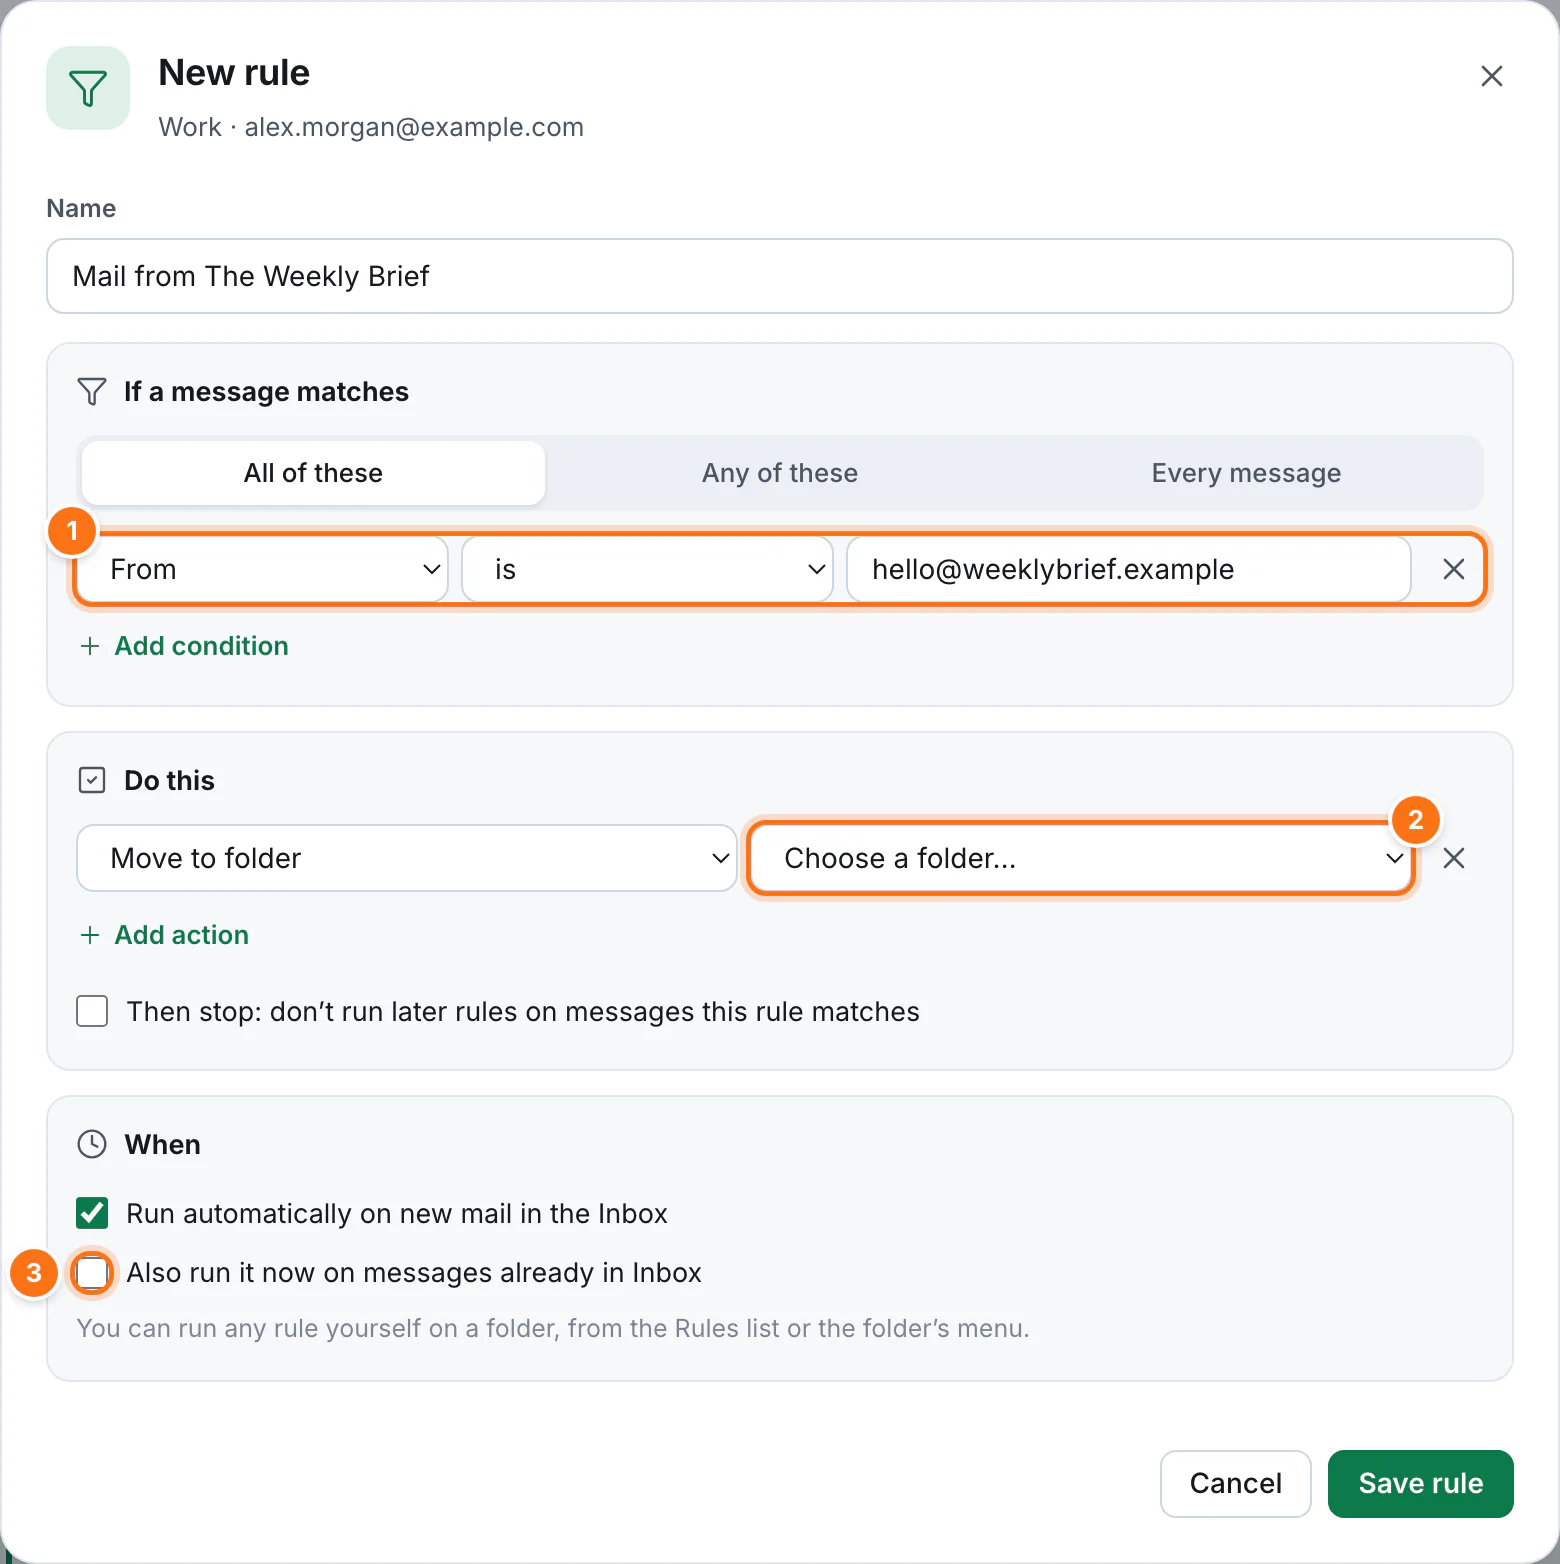
- The rule already matches the message's sender. Change it if you like.
- Choose what to do, for example the folder to move matching mail to. Pick New folder… at the bottom of the list to make one on the spot.
- Tick Also run it now to sort the mail you already have, as well as new mail from now on.
Here is every part of the rule editor:
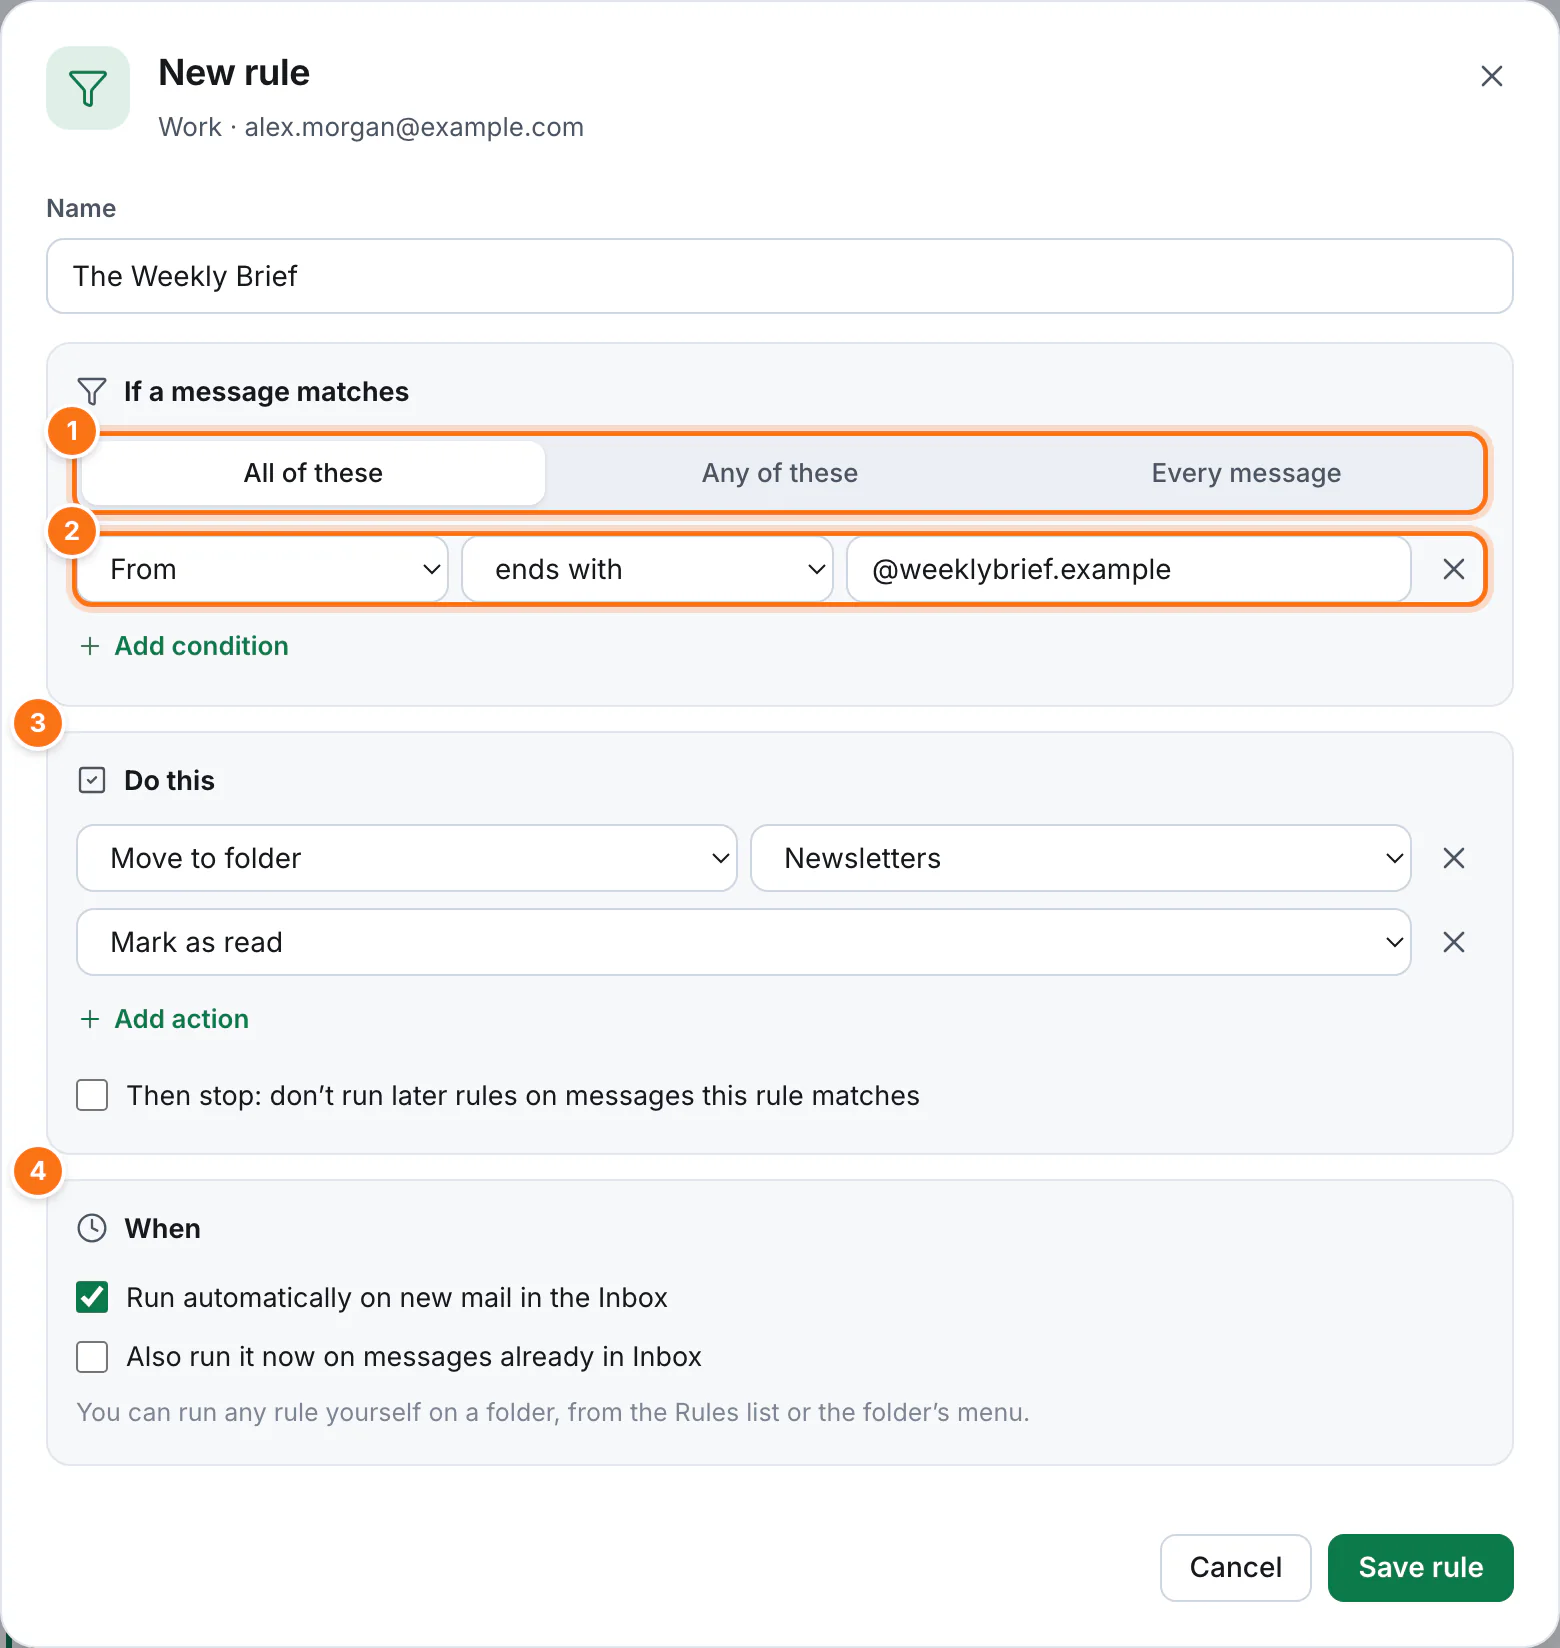
- Which messages: those matching All of these conditions, Any of these, or Every message (useful for clean-ups).
- Conditions. Check From, To, Cc, Subject, the message text, any other header (such as
List-Idfor mailing lists), size, age, attachments, status (read, flagged, replied, forwarded) or tags. Text can be matched with contains, doesn't contain, is, isn't, begins with or ends with. For example, “From ends with@example.com” catches everyone at a company. Use Add condition for more. - Actions: move or copy to a folder, mark as read or unread, flag, pin, tag, mark as junk or delete. A rule can do several things. Tick Then stop so later rules leave matching mail alone.
- When: rules run automatically on new mail in the Inbox. Untick this for a rule you only want to run yourself, such as “delete newsletters older than 30 days”.
Manage and run rules
Open the list of rules with Rules › Manage rules… on the ribbon, Settings › Rules, or Rules… on an account's ⋯ menu.
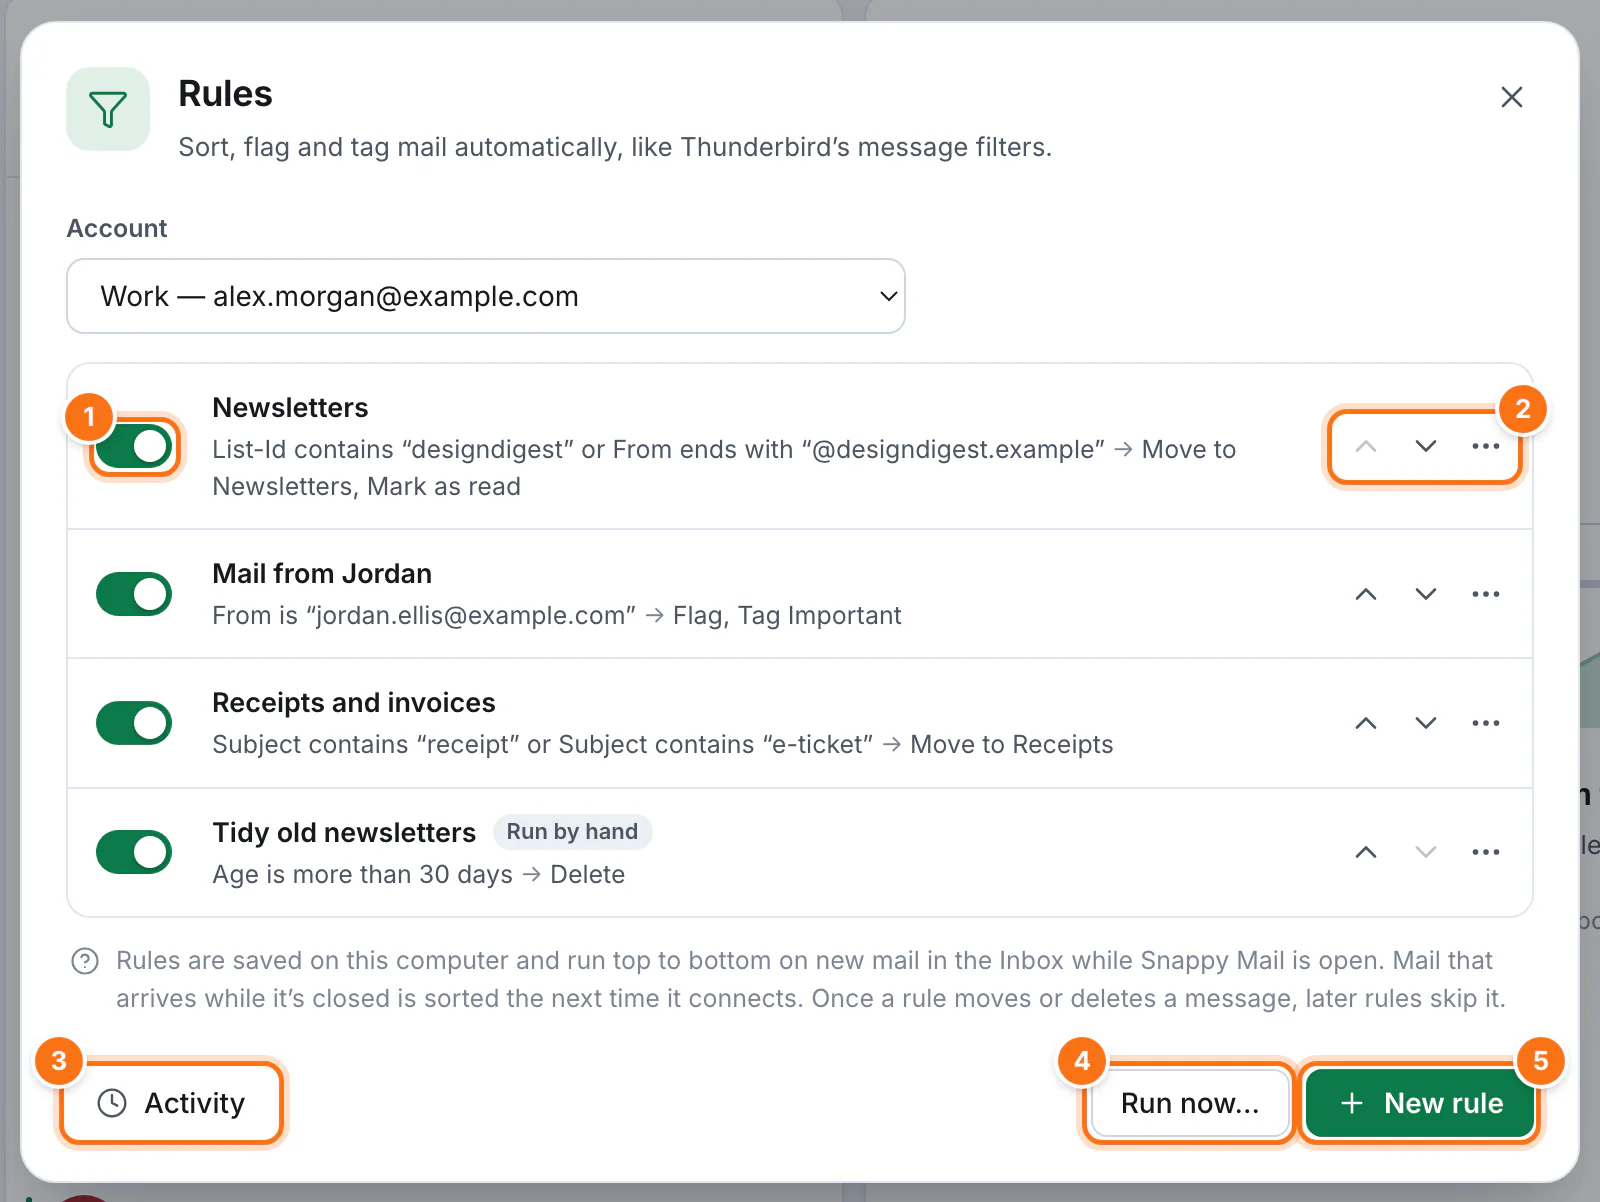
- Turn a rule on or off without deleting it.
- Rules run top to bottom: use the arrows to change the order. The ⋯ button can edit, duplicate, delete, or run a single rule on a folder.
- Activity shows what your rules have done.
- Run now… runs every rule that's on over any folder you choose. You can also right-click a folder and choose Run rules on this folder, or select messages and use Rules › Run rules on selected messages.
- New rule starts from scratch.
Click a rule to edit it. Rules that move mail follow their folder if you rename it. If you delete the folder, those rules switch off, and a “Folder missing” label shows which ones to fix.
Rules activity
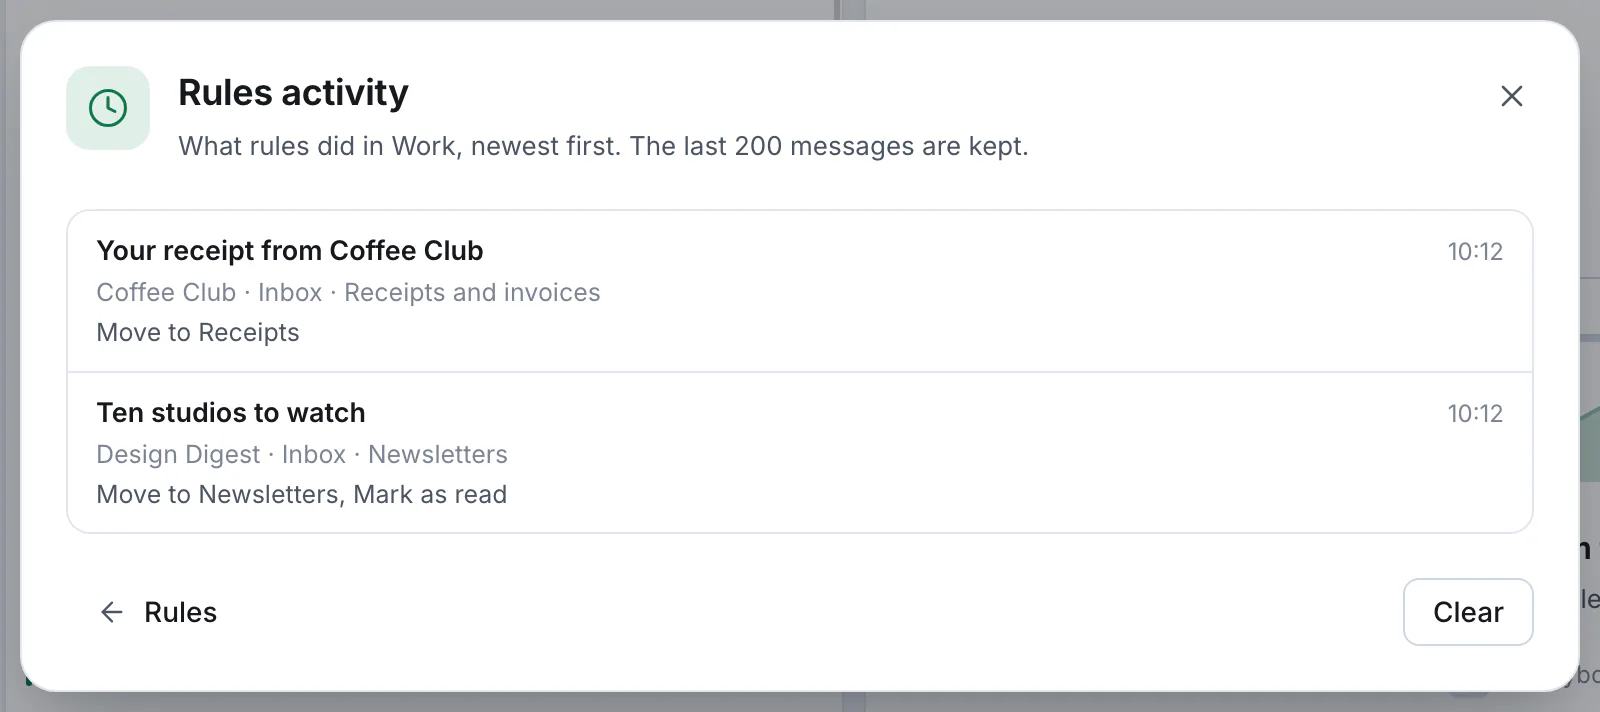
Activity lists the last 200 messages your rules acted on: what each one was, which rule matched, and what it did. Anything that went wrong (a folder that no longer exists, say) is shown in red.
How rules work
- Rules run inside Snappy Mail, so they work with every email provider. New mail is sorted before you're notified, so mail a rule moves away or marks as read doesn't interrupt you.
- They run while Snappy Mail is open. Mail that arrives while it's closed is sorted as soon as you open it again.
- Rules are saved on each computer or phone. If you use Snappy Mail on several devices, set up rules on the one you leave open most.
- Once a rule moves or deletes a message, later rules skip it.
10Notifications
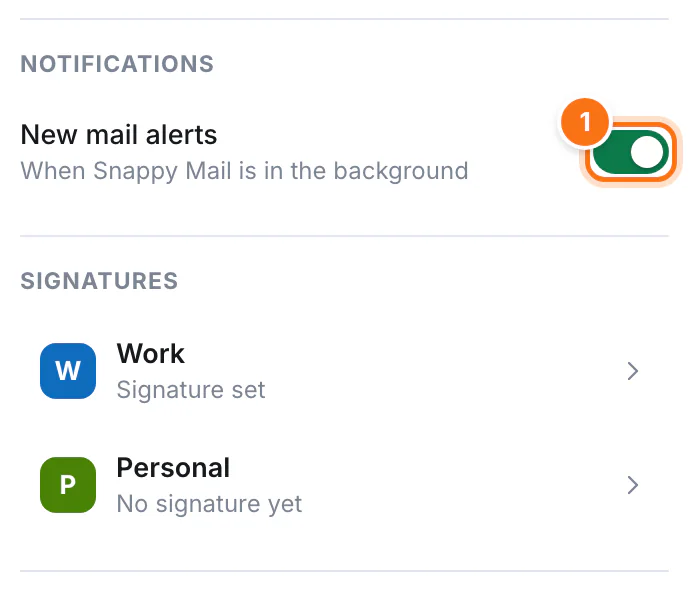
- Turn New mail alerts on or off. When Snappy Mail is in the background you get a notification for each new message, showing the sender, subject and a preview, or a summary when lots arrive at once. Click a notification to open that message.
- Mac: the Dock icon shows how many unread messages are in your inboxes. Closing the window keeps Snappy Mail running so alerts keep coming; press ⌘ Q to quit.
- Windows: the taskbar button flashes when new mail arrives.
- The first time, your computer may ask whether Snappy Mail can show notifications. Choose Allow.
11Layout and appearance
Make Snappy Mail look the way you like from the View tab, or Settings for everything at once.

- Reading pane: on the right, at the bottom, or off (messages then open full width).
- Message list: roomy cards, or a classic table with columns.
- Density: comfortable, cozy or compact, to fit more on screen.
- Conversations on or off. Next to it, show or hide preview text, sender pictures and date groups.
- Theme: light, dark or match your computer, plus an accent colour.
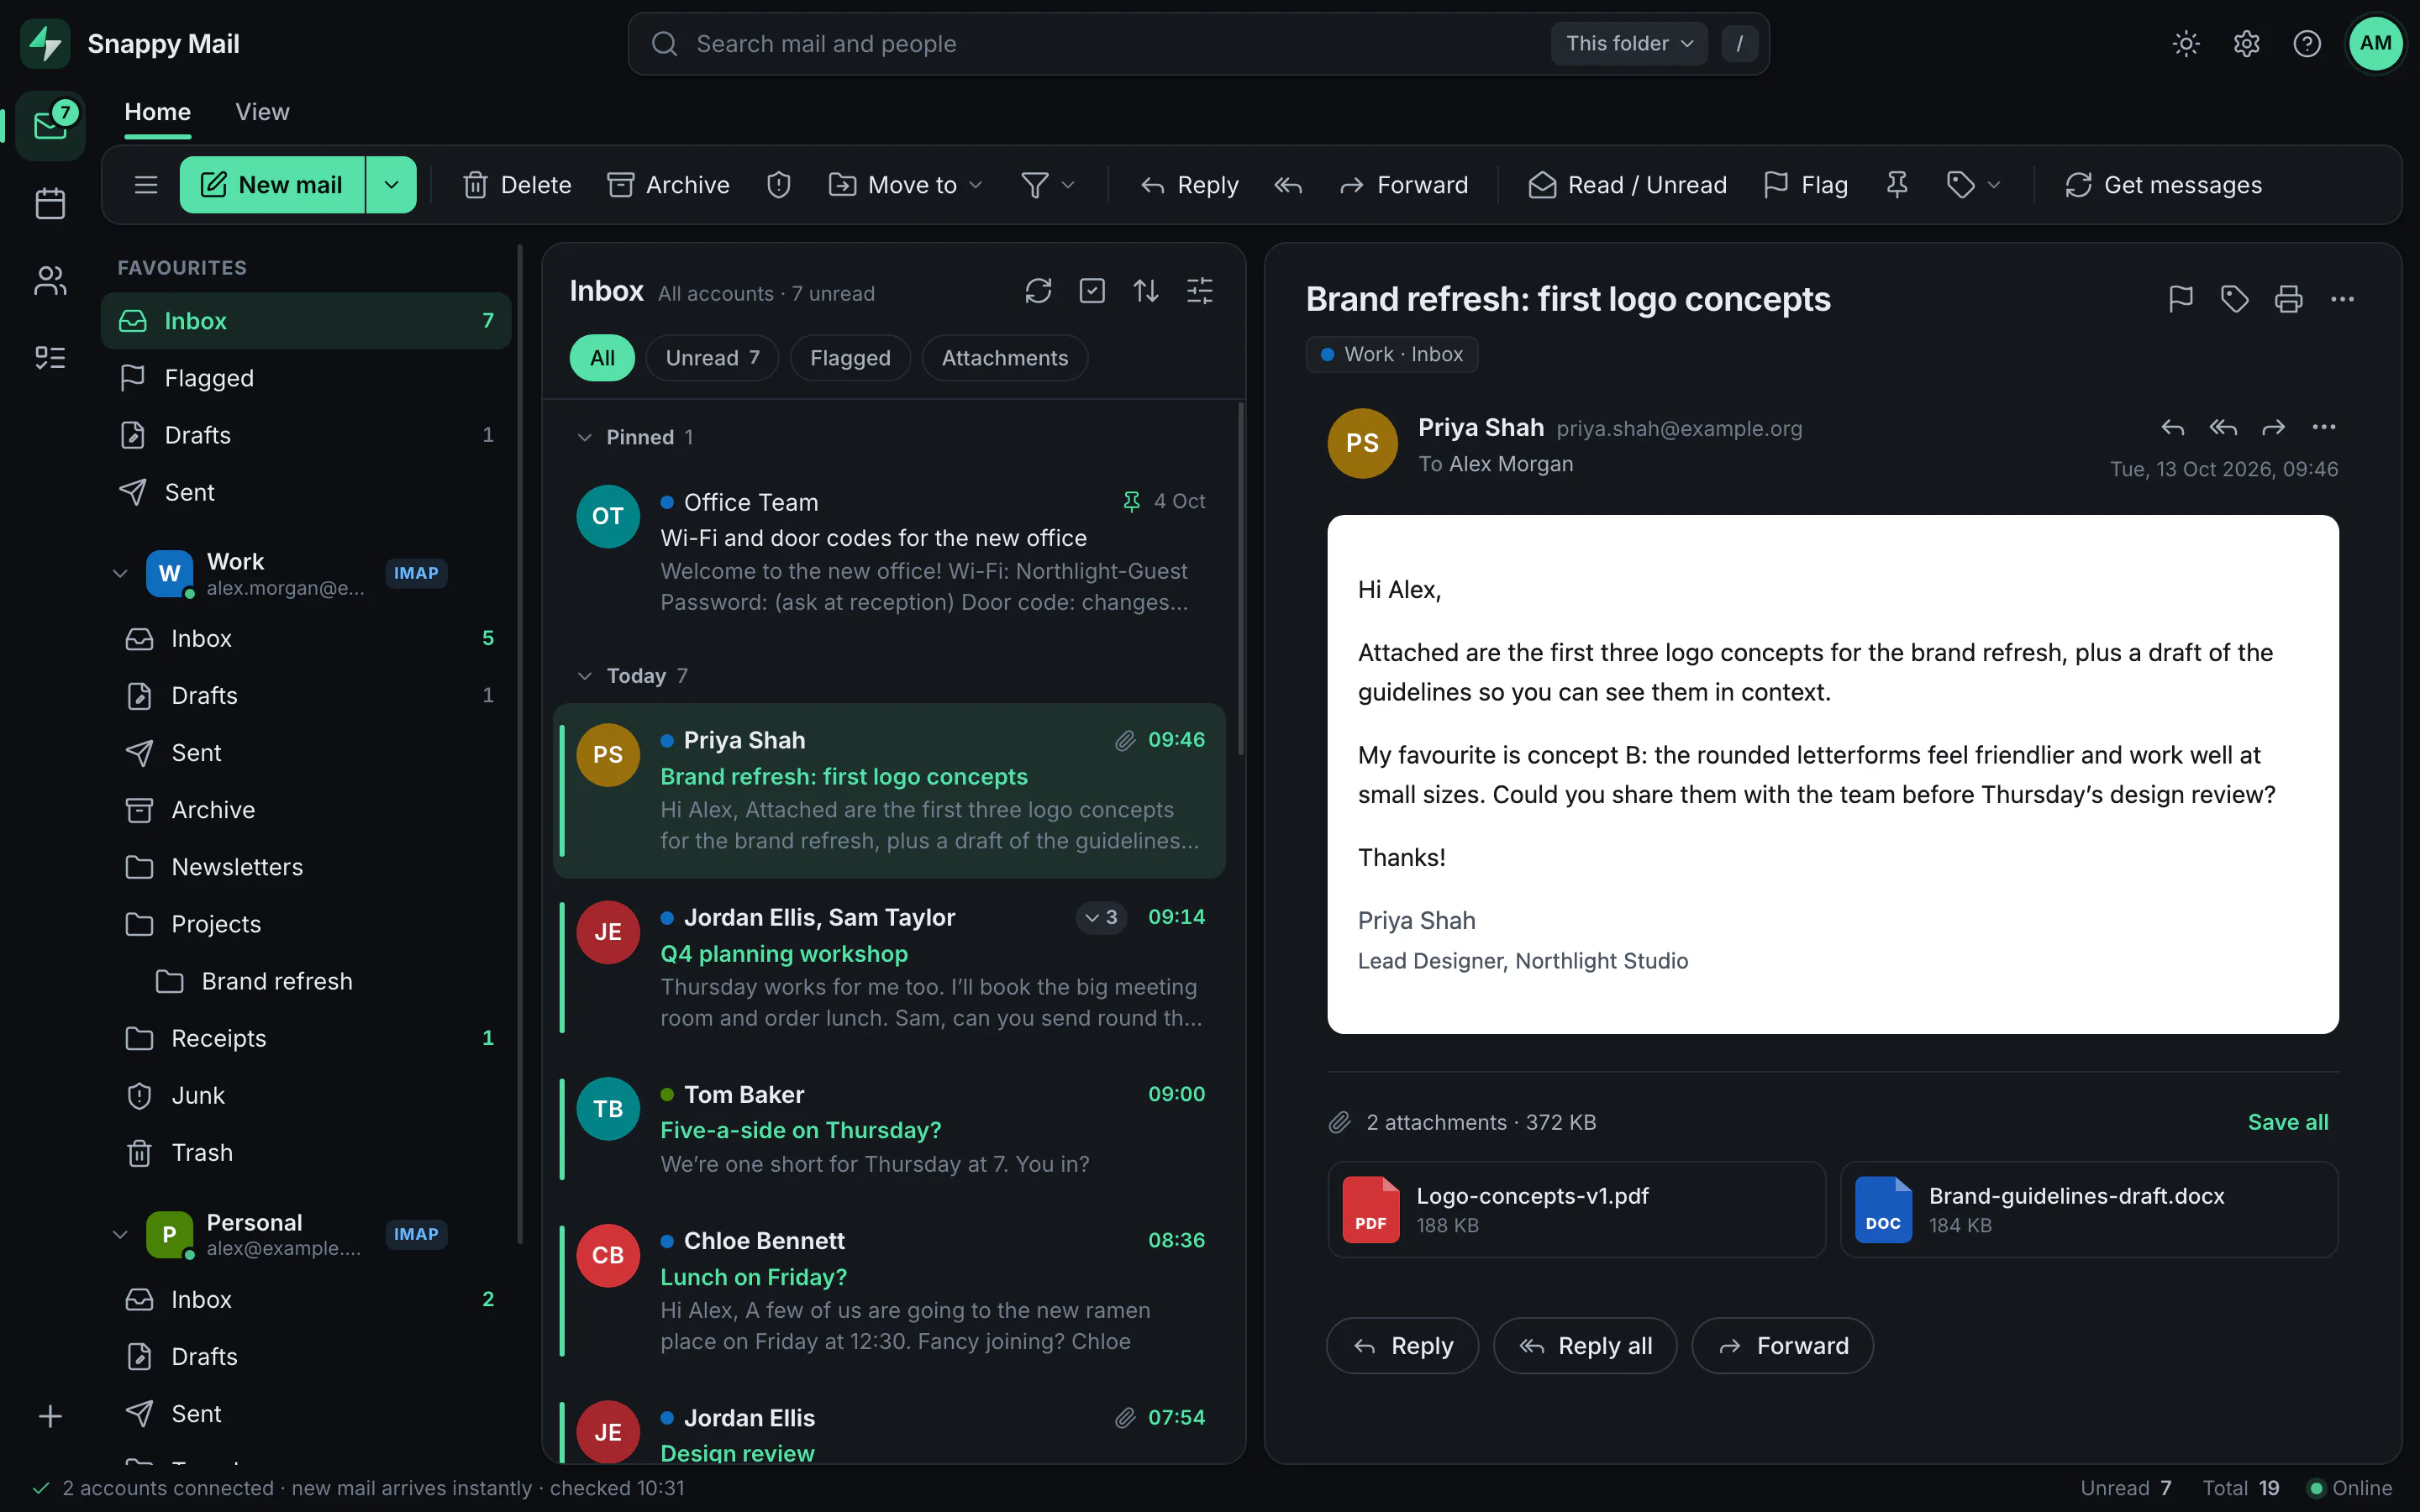
The quickest switch between light and dark is the moon/sun button at the top right.
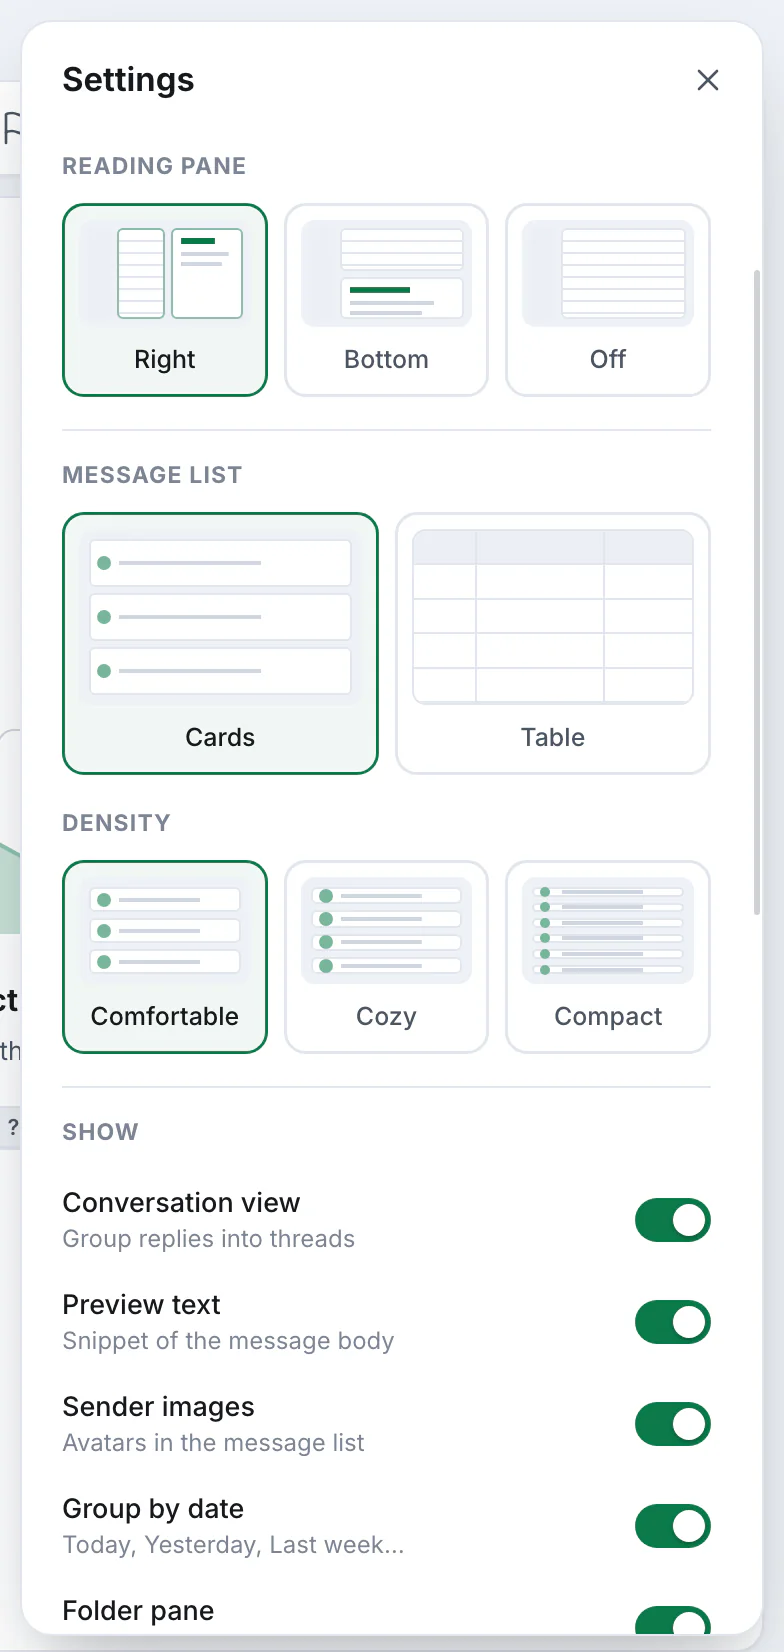
Settings also has your notifications, signatures and rules, when to mark messages as read (when opened, after 2 seconds, or only when you choose), and your accounts. To put everything back, use Reset layout to defaults at the bottom. Drag the line between the list and the reading pane to resize them.
12Keyboard shortcuts
Work through your inbox without touching the mouse. Press ? in Snappy Mail to see this list.
| Do this | Press | Do this | Press |
|---|---|---|---|
| Next / previous message | J K | Read / unread | M |
| Open message | Enter | Flag | S |
| Back to the list | Esc | Pin | P |
| New message | N | Archive | E |
| Reply | R | Delete | Del |
| Reply all | A | Tags | 1–5 |
| Forward | F | Search | / |
| Send message | ⌘/Ctrl Enter | This list | ? |
The desktop app also has a menu bar: File › New Message (⌘/Ctrl N), Check for New Mail (⌘/Ctrl Shift R), Rules… and Settings (⌘/Ctrl ,).
13Account settings
To change an account's name, colour, signature, server settings or password, open Settings and click Manage next to the account, or choose Account settings from its ⋯ menu.
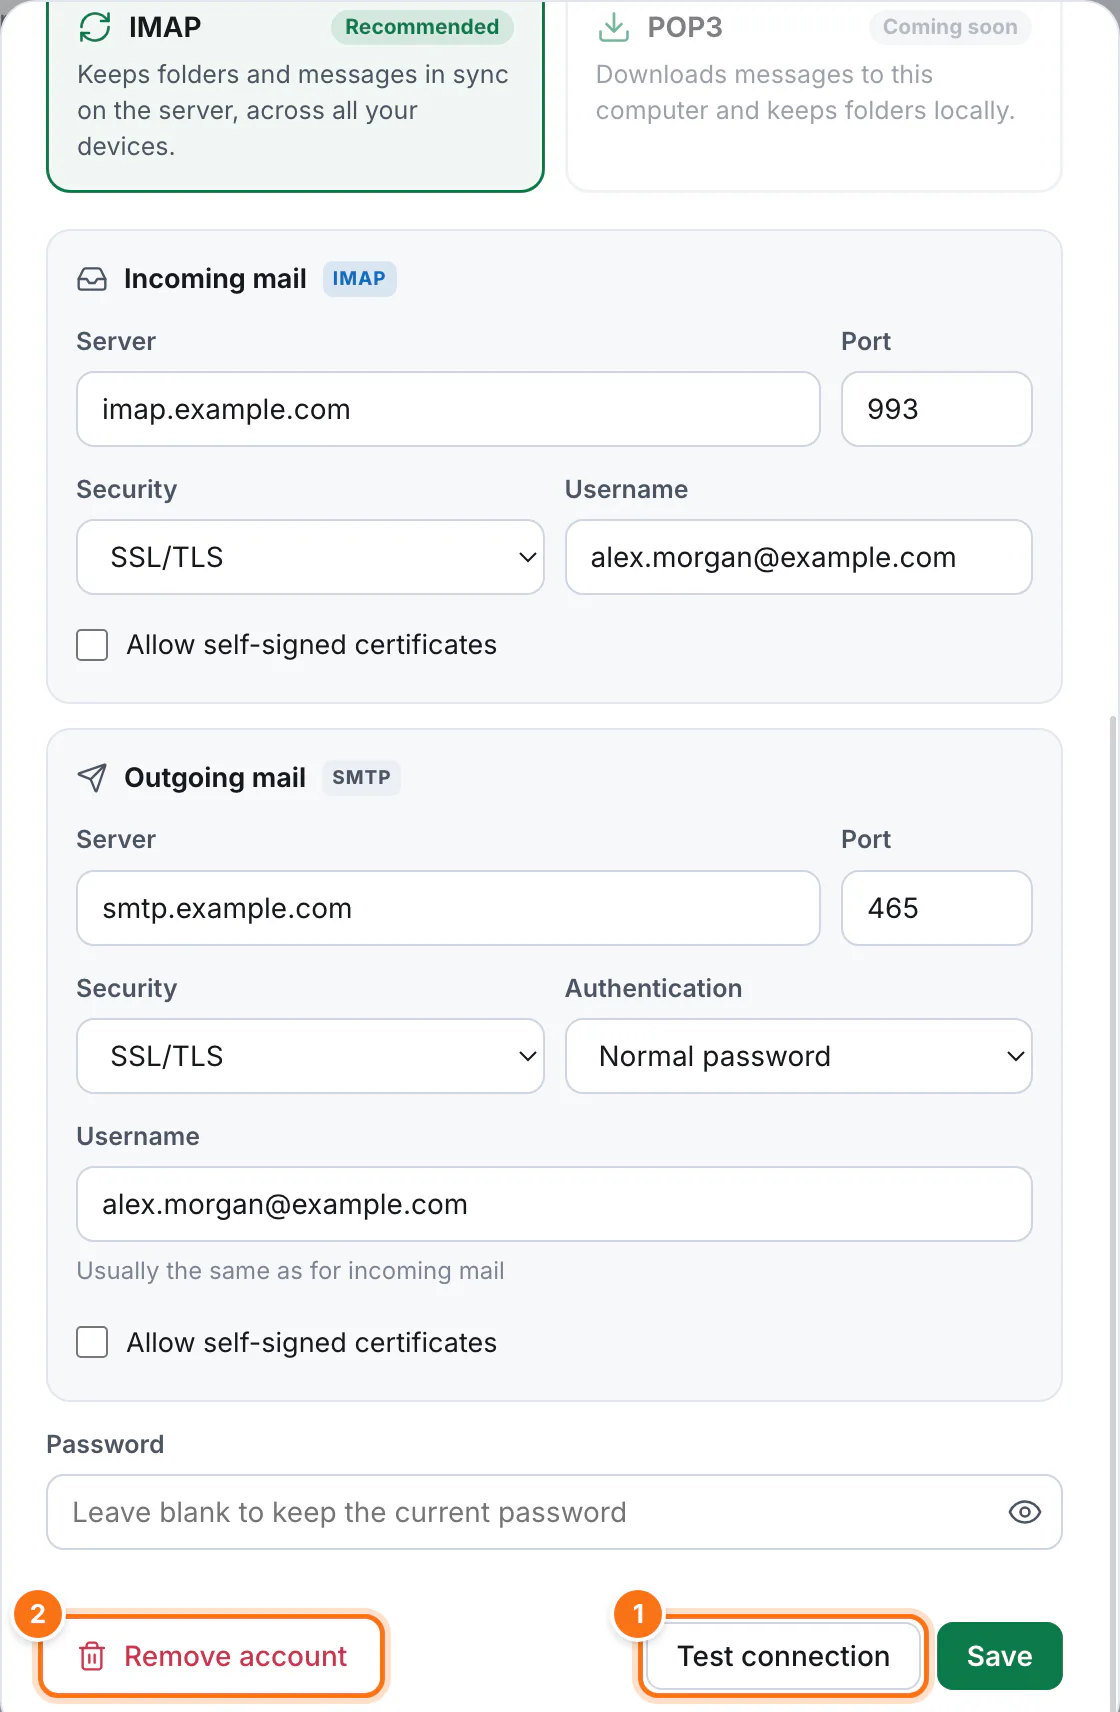
- Test connection signs in to both servers and tells you if anything's wrong, in plain English. Saving runs the same check whenever you change servers or your password.
- Remove account takes the account out of Snappy Mail. Nothing is deleted from your mail server.
- Changed your password? Type the new one in Password and save. Leave it blank to keep the current one.
- Save a copy of sent messages can be turned off if your provider already saves them.
- If an account can't connect, the status bar says why, with a Retry button. Snappy Mail also reconnects by itself when your computer wakes up or your internet comes back.
14On your phone
The Snappy Mail apps for iPhone and Android (coming soon to the App Store and Google Play) have the same features, laid out for one hand.
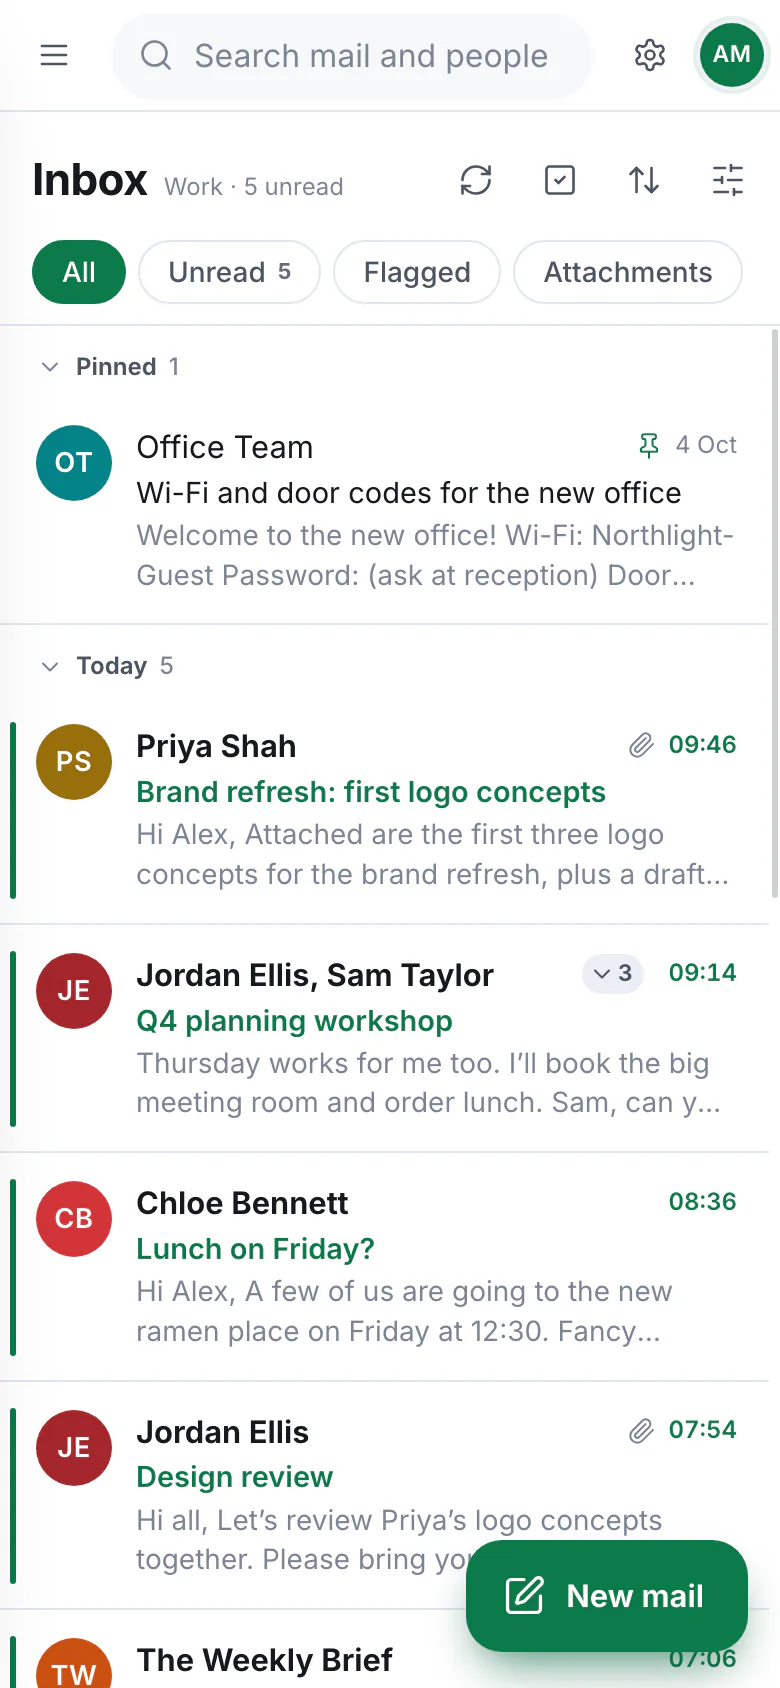
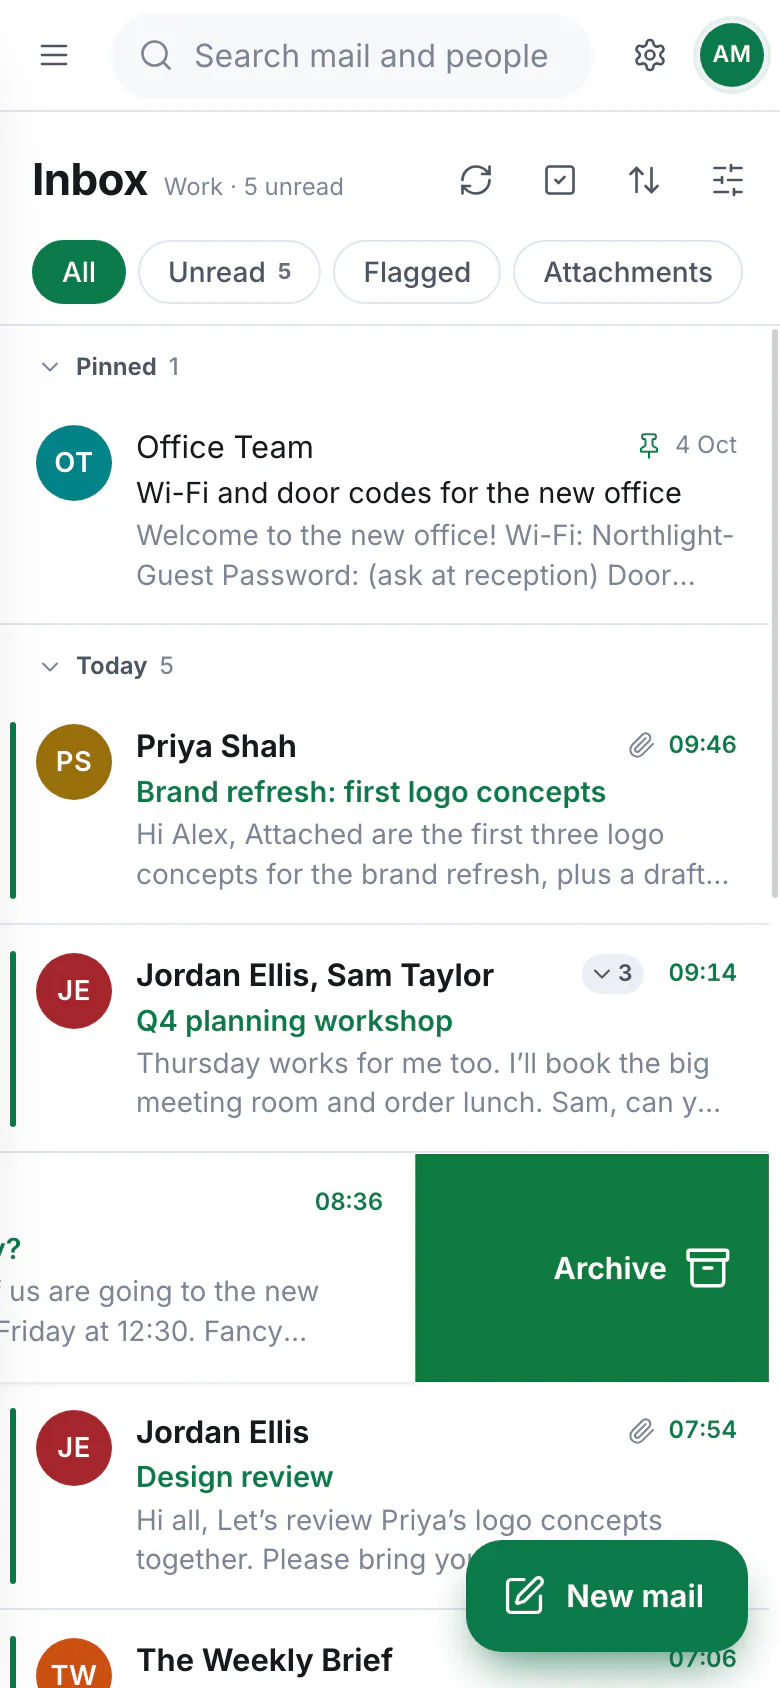
- Swipe a message left to archive it, or right to mark it read or unread.
- Long-press a message to start selecting several.
- Pull the list down to check for new mail.
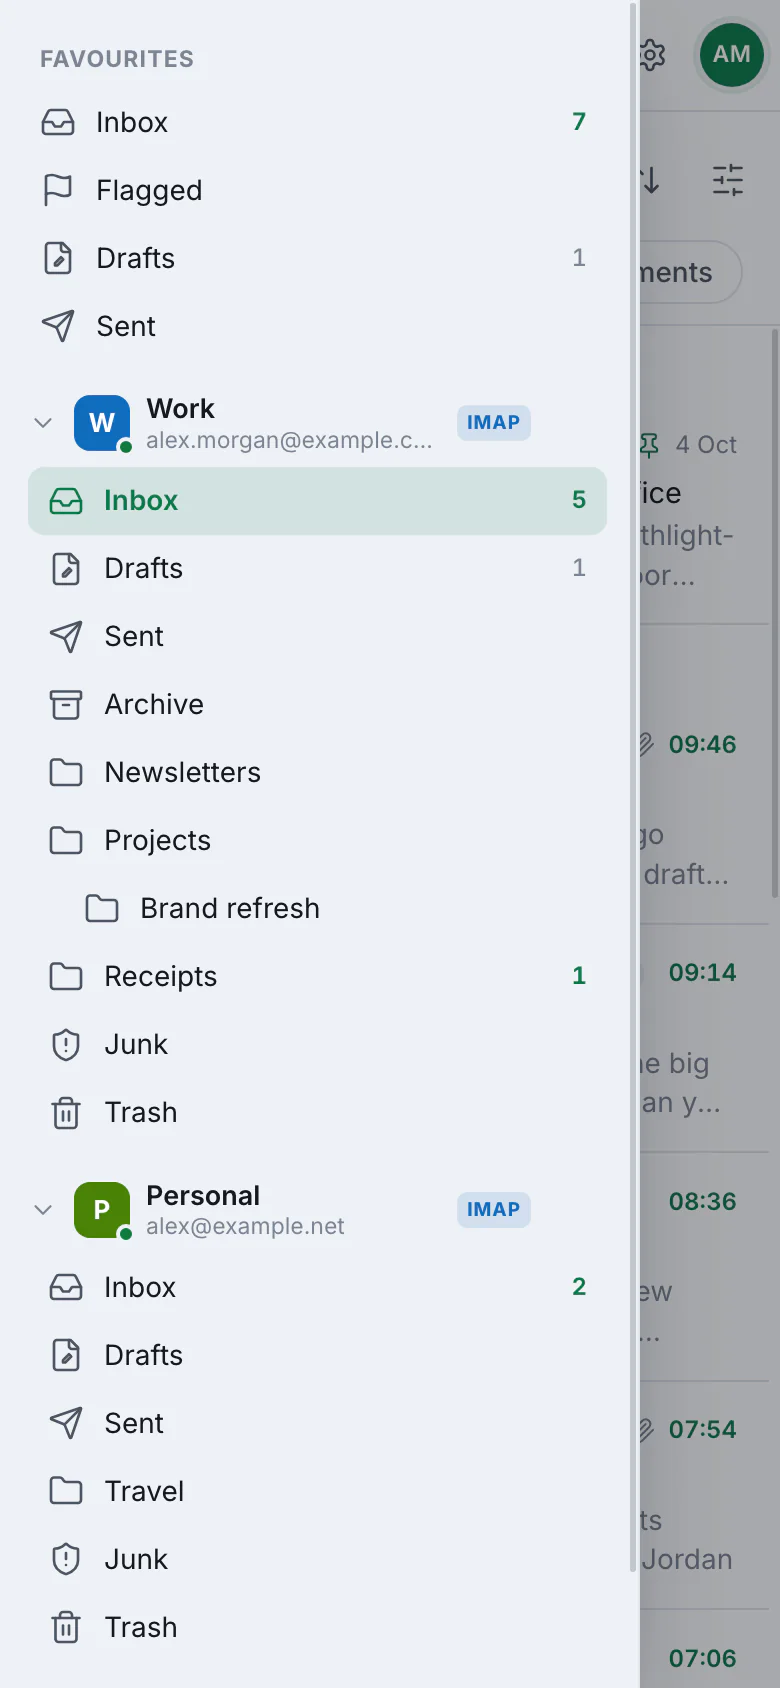
- Tap ☰ at the top left for your folders, and the green New mail button to write.
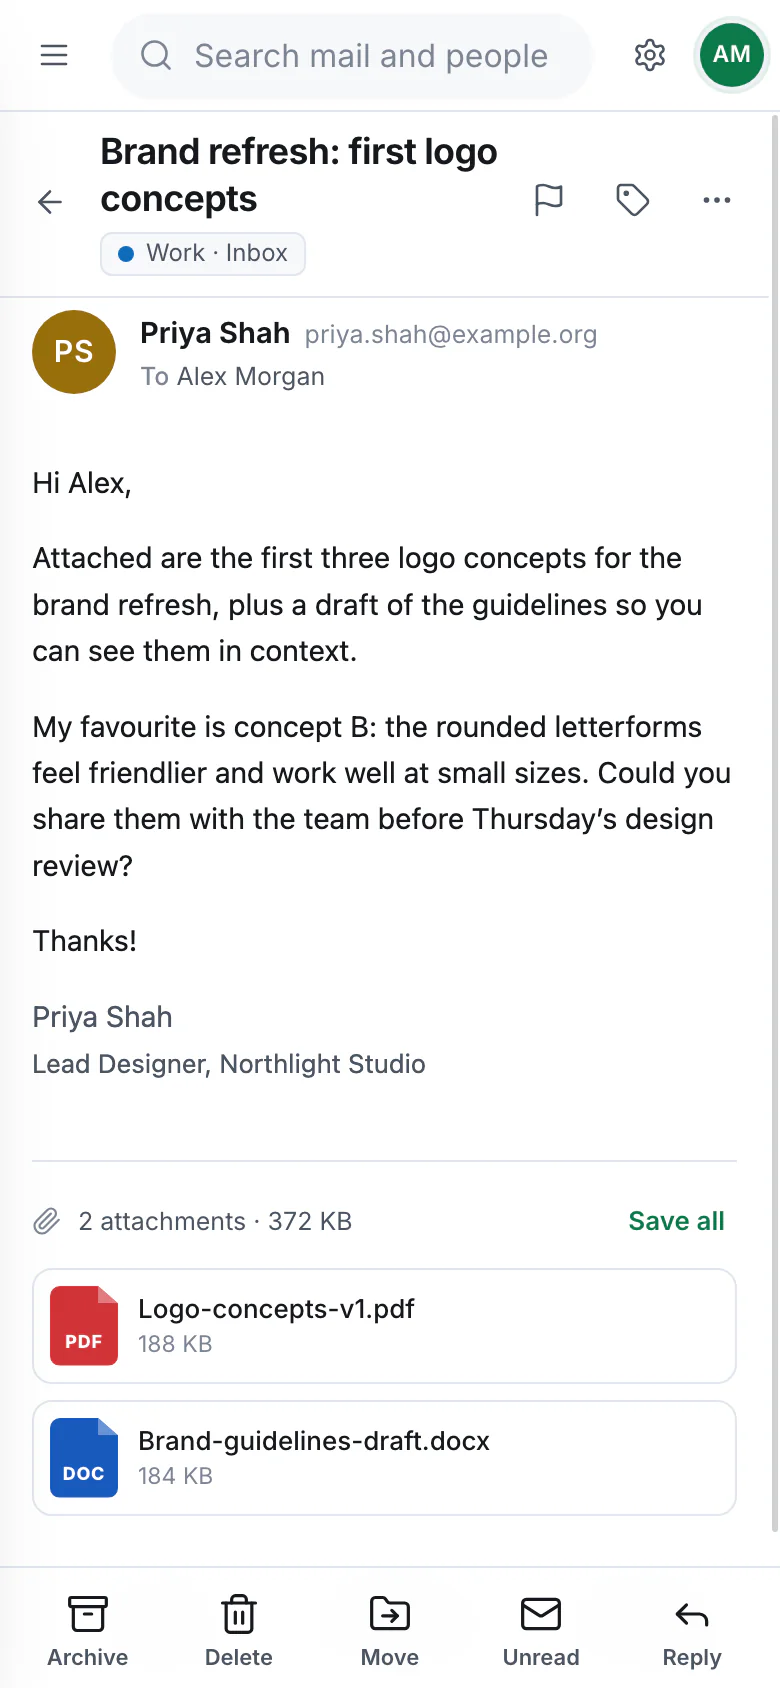
- While reading, Archive, Delete, Move, Unread and Reply are along the bottom. On iPhone, swipe in from the left edge to go back.
- Emails designed for a computer screen are shrunk to fit your phone.
15Privacy and your data
- Your mail goes straight to your provider. Snappy Mail connects directly to your email servers. Nothing passes through anyone else's servers.
- Passwords are encrypted and stored only on your device.
- Remote images are blocked until you allow them, so senders can't tell when you open their email.
- Emails can't run code. Each message is shown in a locked-down frame where scripts and forms never run.
- On a computer, your settings, rules and passwords live in a
.snappy-mailfolder in your home folder. Help › Open Data Folder in the desktop app takes you there.
16Help and troubleshooting
“Sign-in failed”: my password is right
Gmail, iCloud, Yahoo, AOL and Fastmail need an app password rather than your normal one. See Gmail, iCloud, Yahoo and others. For Gmail, also check IMAP is turned on in Gmail's settings.
Can I add an Outlook.com or Microsoft 365 account?
Not yet. Microsoft only allows sign-in through a browser window (called OAuth), which is coming to Snappy Mail soon.
“The security certificate isn't trusted”
Your mail server uses a certificate your computer doesn't recognise. If it's your own or your company's server and you trust it, open the account's settings and tick Allow self-signed certificates.
New mail isn't showing up
Check the status bar at the bottom: if an account can't connect, it says why and offers Retry. Click Get messages on the ribbon to check every folder now. Also check your rules: Rules › Activity shows any mail they've moved.
My rules didn't run
Rules run while Snappy Mail is open, and on new mail in the Inbox only. Mail that arrived while it was closed is sorted when you next open it. To sort mail that's already in a folder, right-click the folder and choose Run rules on this folder. Make sure the rule is switched on and has Run automatically on new mail in the Inbox ticked.
Can I use POP3?
POP3 accounts are coming soon. For now Snappy Mail uses IMAP, which keeps your mail on the server and in step across all your devices.
Where do deleted messages go?
To your account's Trash folder, where you can move them back. Deleting from Trash, or Empty Trash on the folder's menu, removes them for good after asking you to confirm.
Still stuck? Visit snappymail.app.